Have you ever felt like you’ve hit a wall trying to solve a trivial problem? Sometimes it may stop you from learning a new skill. Here are some tips for aspiring 3D visualizers to help you fix some common mistakes and easily improve your workflow.
Objects are missing or cut off in render view
If objects disappear or get partially cut off during rendering from a camera, you have a problem with Clipping Distance.
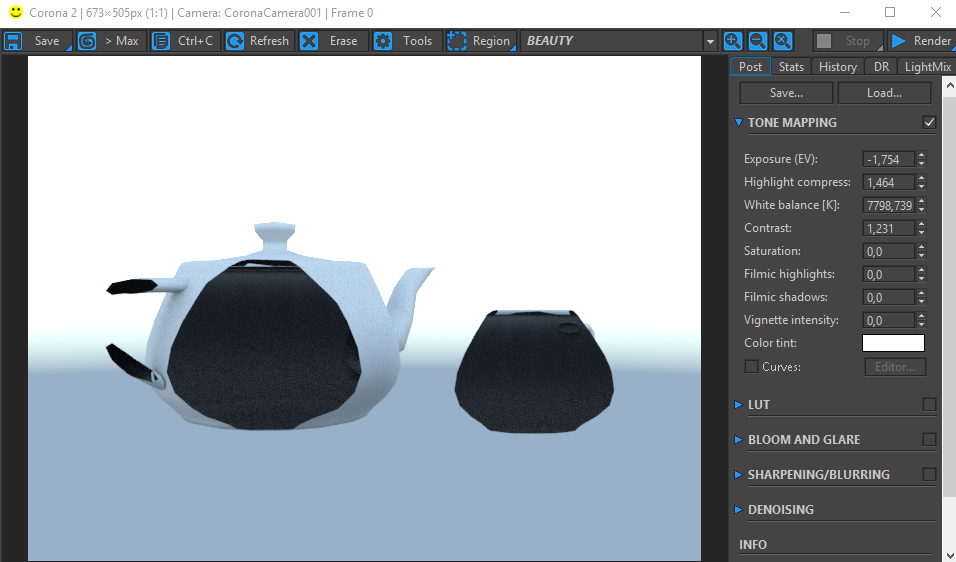
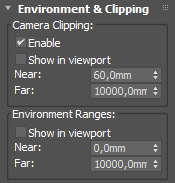
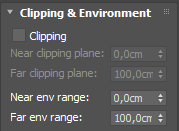
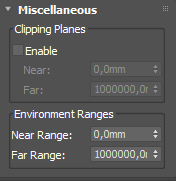
Depending on what camera you use, the parameters could be located in different places. In CoronaCamera there is an Environment & Clipping tab (Chaos Corona), and in VRayPhysicalCamera, the name is Clipping & Environment instead. In standard PhysCamera clipping settings are hidden under Miscellaneous. Uncheck the Enable box or adjust the Near value, and your objects will appear again.
|
|
|
|
|
CoronaCamera |
VRayPhysicalCamera |
PhysCamera |
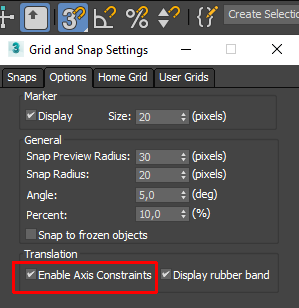
Choosing axis unavailable when using snaps
3DS MAX lets you apply transformations on any single axis or a pair of axes. If you need to move an object to a particular point in the scene, activate snaps by pressing S. By default, the object moves across all the axes simultaneously, locking the individual choice. To move/rotate/scale an object on a single axis using snapping in 3DS MAX, right-click the Snaps Toggle icon, and check the Enable Axis Constraints box in the Options tab.
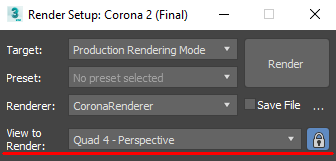
Rendering a fixed camera instead of a current viewport
When working on a scene, you have to switch between several views and projections constantly. However, rendering usually needs to be done from a single camera or viewport. This camera/viewport can be locked as the primary rendering source. Open the Render Setup menu (F10) and choose the needed camera or viewport in the View to Render list, then click the lock icon next to it.
The selected view must be present in your viewport when you hit render (maximized or as one of the quads). Otherwise, the active viewport will render instead.
Fast access buttons for modifiers
During 3D modeling, you will often use the same modifiers again and again. Instead of searching for them in the long list, creating dedicated buttons for modifiers is better. Right-click the Modifier List scroll and choose Configure Modifier Sets. Now you can set up the total number of buttons and drag the modifiers you need into them. For a start, create buttons for Edit Poly, FFD 4x4x4, Symmetry, TurboSmooth. Eventually, you will assemble a shelf of modifiers most suitable for your workflow.
Viewport shortcuts
Using 3DS MAX keyboard shortcuts boosts the productivity of work in any software. When you haven't gained enough experience yet, you may accidentally click a button and see your viewport or tool's behavior change. Here is a list of hotkeys that can cause that:
Alt+W - maximizes the selected viewport. If pressed when the viewport is already maximized, it switches to quad view instead.
G - shows/hides the grid in the selected viewport.
Alt+Ctrl+V - shows/hides the ViewCube.
Switching between the different views:
C - view from the camera;
P - perspective view;
U - orthographic view;
T - top orthographic view;
L - left orthographic view;
F - front orthographic view.
Shift+W - shows/hides the SteeringWheels; this is a handy tool for viewport navigation using only a mouse.
Ctrl+C - creates a camera and sets the active viewport to it. To exit the camera view in 3DS MAX, press P.
Z - set the view to center and zoom in on the currently selected object. If there is no object selected, it centers the whole scene at the start of the coordinates.
F3 - toggles the wireframe view.
F4 - toggles the display of the edges.
Ctrl+L - toggles between using the scene or default lights. Press it if all the objects in the viewport have turned black.
A, S - activate Snap and Angle Snap tools. If your objects and subobjects start moving,rotating, or scaling in weird and jumpy ways, this is a sign of active snaps. They are also represented by the highlighted icons in the top ribbon.
![]()
Insert - toggles Affect Pivot Only mode. In this mode any move/rotate/scale actions are applied to the pivot and not the object as a whole. Press Insert again to exit the mode.
I - pans the view to center on the cursor location. If your view moved away from any objects, press Z to re-center.
If your cursor has changed or you start creating objects you don’t want, press Esc several times to quit any tools you’ve entered accidentally. To undo recently made actions you didn’t plan on, press Ctrl+Z.
-
Check out our CGI Academy for more tips and tutorials on 3DS MAX and other 3D software. When you are ready to start professional rendering, sign up with Megarender and launch your project in the cloud!


