How can I save on denoising?
Corona Renderer is built in such a way that, during distributed rendering, only one machine will work on denoising, while the rest will be on standby. To avoid paying for servers that are not actually doing anything, you can run denoising on your own computer.
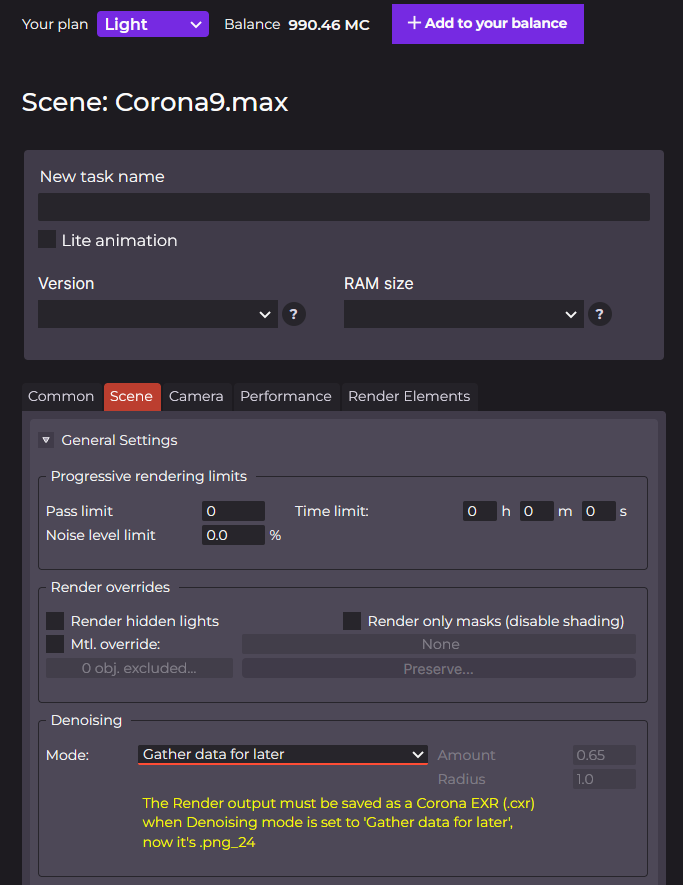
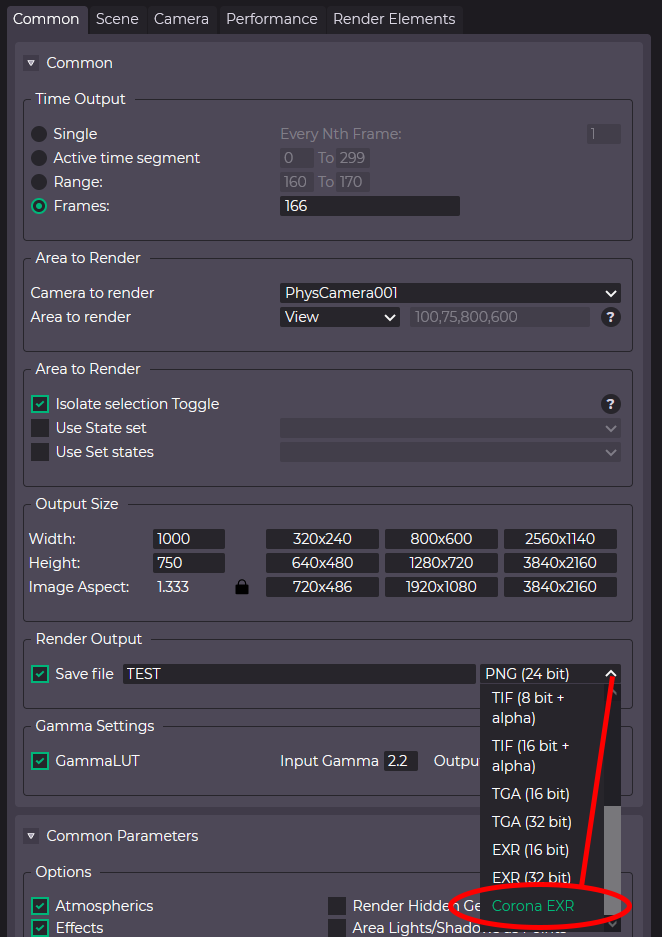
1. Launch rendering on our render farm, choose the option to save it as an .CXR file, and select the Denoise mode as 'Gather data for later'.
What is "baking"?
Light calculation during rendering is a task individual to each computer, and that’s why rendering the same scene on different computers may lead to inconsistencies. This is especially critical in animation, where it leads to flickering of lights and shadows. This is why it is important to prepare files with global illumination information for the scene before rendering. This process is called Global Illumination (GI) Baking. Then, during rendering, render farm computers will use this information from a file.
First of all, make sure to do some test renders and check the scene for possible mistakes: levitating objects, geometry deformation, missing objects and assets. For test renders put Irradiance Map and Light Cache into Single mode, and start the render with a step of 50 or 25, depending on the camera movement speed.
Case 1: simple camera path (500 frames, only camera is moving, but objects and lights are fixed)
Start by calculating the Global Illuminations:
1. In task properties on our online service, in the Common tab, set Active Time Segment equal to the rendering amount of the camera you need.
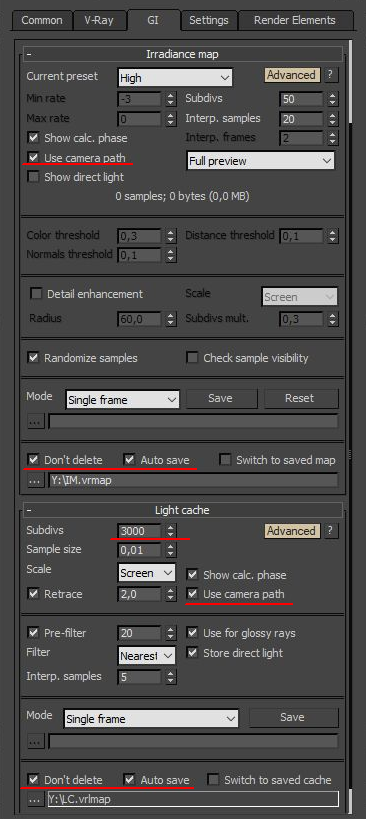
2. Customize GI:
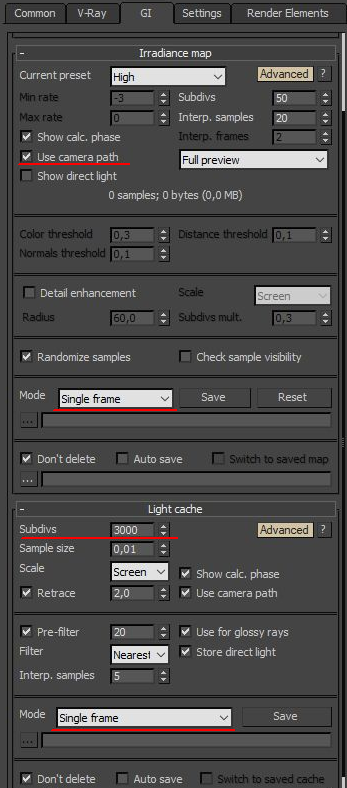
- Light Cache set to Single Frame, with Use Camera Path and Auto Save selected, Subdivs turned up to 3000-5000.
- Irradiance Map set to Single, with Use Camera Path and Auto Save selected. You can increase the amount of Subdivs.
3. It is IMPORTANT to set Light Cache and Irradiance Map to be saved into a file! Then start rendering ONE SINGLE FRAME. IM and LC information will be saved into files, and you can start final render.
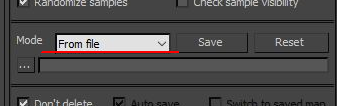
4. Render the final animation, setting LC and IM to From file.
Case 2: complicated camera path (> 500 frames, but objects and lights are fixed)
Rendering should be done in two tasks.
Task 1:
1. In task properties on our online service, in the Common tab, set Active Time Segment equal to the rendering amount of the camera you need.
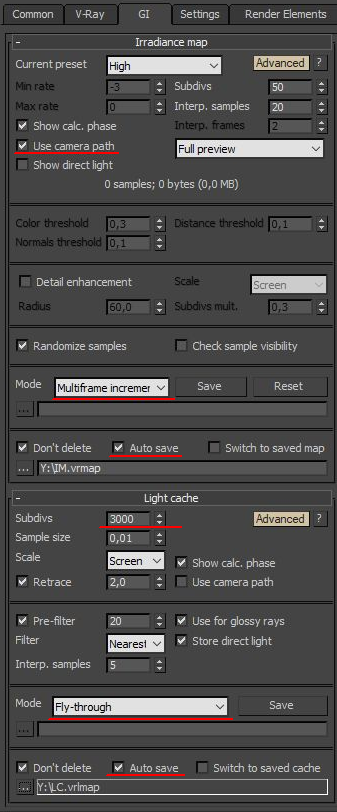
2. Light Cache set to Fly-Through, with Auto Save selected and file path chosen, Subdivs turned up to 3000-5000.
3. Irradiance Map set to Multiframe, with Auto Save selected and file path chosen.
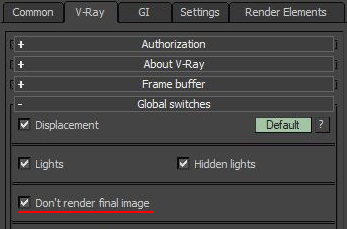
4. Select 'Don’t render final image' option in the V-Ray tab.
5. Start rendering with a step of 10-25 (depending on the complexity of the camera trajectory and its speed).
Task 2:
1. Light Cache set to From file with this saved file chosen.
2. Irradiance Map set to From file with this saved file chosen.
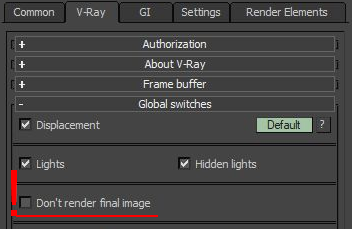
3. ATTENTION! Deselect 'Don’t render final image' in the V-Ray tab (otherwise, you’ll get black images as a result).
4. Render the whole array of frames needed.
Case 3: simple camera path, but objects and/or lights are moving
1. In task properties on our online service, in the Common tab, set Active Time Segment equal to the rendering amount of the camera you need.
2. Customize GI:
- Light Cache set to Single Frame, with Use Camera Path selected, Subdivs turned up to 3000-5000.
- Irradiance Map set to Single, with Use Camera Path selected.
3. Start final rendering of the whole array of frames needed.
I already have Light Cache and/or Irradiance Map calculated. How do I upload them?
After scene verification, follow the link to the file manager using your login and password - https://my.megarender.com:9090/ Here you should put your files into the folder, with a path looking like: “scene_name\__import__XXXX\renderoutput\”. After this, during your scene setup in the service interface, write in the NAMES of your files with EXTENSIONS, but without paths or indexes (frame numbers).
ATTENTION! Make sure to calculate your LC and IM using V-Ray v3.6.1 or higher to avoid any problems. Always do a test render with saving the results.
How to use caches for PhoenixFD and RealFlow
1. Calculate your simulation and save it into a file.
2. Set your scene to reading the simulation FROM FILE.
3. Export your scene using our Megaplugin(!) and upload it to our service.
4. The plugin won’t collect all the caches (because they can be very big), so after scene check you’ll need to upload the rest of them to the FTP server. To do this, open the folder “scene_name\__import__XXXXX\sceneassets\caches\PhoenixFD\object_name” and upload all the remaining cache files in it.
After this, it is CRUCIAL to make a test render of several frames to check that the effects are rendered correctly.
How to use Corona or V-Ray LightMix on the farm
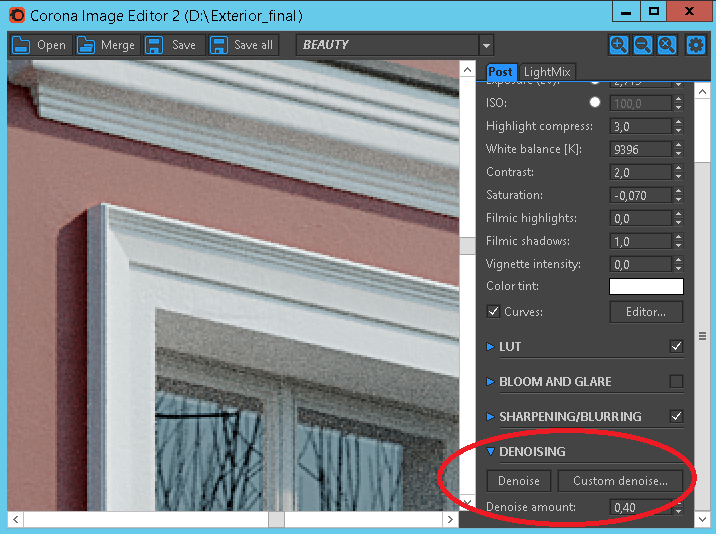
It is impossible to change LightMix parameters on the render farm (neither during nor after the render), but you can choose to save your project result as a .CXR file and adjust LightMix later on your computer.
If your saved CXR file won’t open, or you don’t see LightMix set up in it, try to re-open it with Corona Image 2 or Corona Image 4.
In V-Ray:
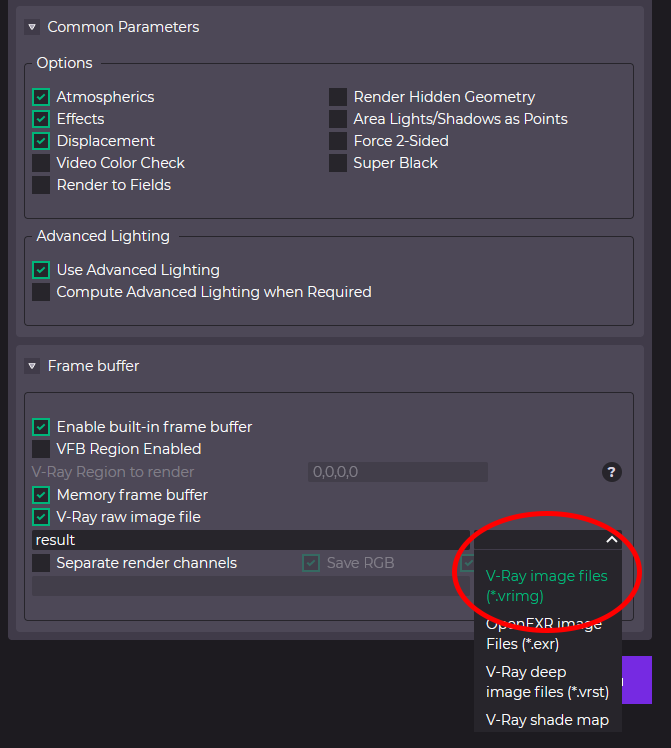
On a farm, it is impossible to render V-Ray frame buffer effects, such as Color Correction, Bloom&Glare, and LightMix (V-Ray 5+). However, you can set your task to render in .VRIMG (V-Ray raw image file) format and then open this file in V-Ray frame buffer on your computer.
This way, you’ll be able to apply any special VFB features to the rendered image, including changing LightMix settings in V-Ray 5+.
Why can’t I use the Noise threshold alone?
We have to use a definitively reachable limit when rendering on a farm, such as a Pass or Time limit. The Noise threshold can be used as an additional limit because it may never be reached theoretically.
To guarantee the required quality of your rendering, use the Pass limit. Learn more on how to set the number of passes here.
If you have no way of determining the Pass limit, apply “budget thinking.” Use Noise threshold and Time limit together, keeping in mind that 1 hour of rendering on Light rate costs 6,16 MC. Time limit is useful when you have a cost you don’t want to get over with your render. For example, a Time limit of 30 minutes means your image will cost no more than 3.2 MC on Light and no more than 4.1 MC on Standard.
How many passes should I set?
There is no definitive answer to this question. Everything depends on the complexity of the scene, materials, and lighting settings. Here are some ways on how to determine the amount of passes needed.
- Region test. If you need to reach a certain noise threshold, first run a test on your computer. Launch rendering in a desired resolution but of a small region (preferably, of the most complex part: glass, water, displacement, reflective surfaces). Run it until the desired noise threshold is reached. Use this final number of passes when launching tasks on the render farm. Add 5-10 passes on top of it just to be sure.
- Time limit. If you cannot run the region test and you have a set budget, use Time Limit instead of Pass Limit. At Light rate one hour of distributed rendering costs approximately 6,5 MC. Set the Time Limit accordingly so you don’t go over your budget.
- Follow the progress through the preview. If you don’t have time for testing and no strict money limit, set an unreachable number of passes, for example 999. After you launch the rendering, follow the progress through the Preview button. When you think the current noise level is satisfactory (but has not yet reached the threshold), contact the support team in the chat and ask them to stop the render and save the progress. Remember the amount of passes before the stopping and use it for the next cameras in this scene. Don’t stop the rendering on your own or the result will be lost!
- Optimize the scene. If you have a limited budget but the preview shows that your scene will be rendering for a long time to reach the desired quality, stop the rendering (you won’t be charged). We have some advice on how to optimize your scene. After optimization is done, run a Region test (point 1).
It is important to set two rendering limits to guarantee your task won’t render for an infinite time. In complex scenes, rendering from the start to 4% noise can take the same amount of time as rendering from 4% to 3%. However, the difference in quality may not be that noticeable.
Why should I do test renders?
Why are test renders so important when working with the render farm?
It is important to understand that exporting any 3ds Max scene, especially scenes with many objects in them, is not an easy task. Many options are tied to the application itself, and sometimes you won’t even remember that you’ve changed them. 3ds Max, Corona, V-Ray and third-party plugin version mismatch may lead to unpredictable results.
The most common reasons for render results not matching expectations:
1) Modifiers:
When preparing your scene to be sent to a render farm, it is important to collapse the modifiers stack. If all the modifiers are not collapsed, this can cause geometry breaking, objects going missing or deforming. If you work with 3ds MAX 2011 or earlier versions, any Boolean objects will almost certainly not look right on the farm’s computers.
2) V-Ray and Corona versions:
We support the most popular and up-to-date versions of render engines on our render farm. But if you created and tuned your scene in older or test versions, it can lead to mismatches. It is preferable to convert your scene to the latest versions of V-Ray and Corona, or the supported versions listed on our main page.
3) Plugin errors:
Unfortunately, sometimes our plugin makes mistakes. When working with big scenes, some assets may go missing. If you need to use cache files, you’ll have to upload them manually.
4) Gamma problems:
V-Ray users often manually change the gamma level when saving an image after rendering. This is in no way reflected in exported scenes, so the final render may be too dark or too light. If you don’t know how to properly set up your gamma for render farm rendering – check these instructions.
5) Mistakes in the scene:
Sometimes, you won’t notice certain mistakes in the scene before you start rendering. The geometry may not fit together properly, the objects may be hovering in mid-air, textures are applied incorrectly, materials are not set up properly... Test render is your last chance to notice these and fix them without losing time and money.
6) 3ds MAX glitches:
Unfortunately, unpredictable 3ds MAX problems also happen, and it is hard to be prepared for them. For example, MultiScatter can sometimes glitch, and each grass blade on the lawn becomes the size of a tree…
The common thing in all these situations is that they could be noticed after making a test rendering. A test rendering of several animation frames or still image, but in a small resolution, will help check if your scene, lights and materials properties are correct; where the objects are located; and how the particle effects are displayed. The cost of test rendering is very low in comparison to rendering a full project, then noticing a mistake afterward, and re-rendering it from scratch.
And if the test rendering doesn’t show any mistakes, you can start the final rendering without re-uploading the whole scene!
What plugins do you support?
We support almost all the popular plugins on our render farm. You can check plugins’ availability in the table below. If you don’t see a plugin you need listed, contact our tech support, and we’ll try to help you!
|
3ds MAX |
Forest Pack, RailClone Pro, Clone, Glue, ColorEdge, MultiScatter, VRayPattern, MadCar, CityTraffic, SplineLand, FloorGenerator, Multitexture, Phoenix FD, FumeFX, RealFlow, Xmesh Loader, Substance, tyFlow, RichDirt, ColorCorrect, BerconMaps, Greeble, Quad Chamfer, TurboSmooth Pro, GradientEdge, OpenSubdiv-MPS, SigerTools, AXYZ Anima, laubwerk, Ornatrix |
|
Maya |
Substance, Phoenix FD, RealFlow, JoeAlter Shave and a Haircut, Yeti |
To receive the most up-to-date information on supported versions of the plugins, or ask questions about how to use them, just contact our tech support.
How to raise priority of the project?
You have an urgent project, the render farm is busy, and you have no time to wait for your turn? You can get priority in the rendering queue by choosing the “Business” plan in your profile.
What will happen if my balance runs out during rendering?
Rendering of a single task:
Your image will finish rendering and will be saved to the FTP server, but you won’t be able to download it until you replenish your balance.
Rendering of several tasks:
The fastest task will finish rendering and will be saved to the FTP server, but the rest of the tasks will be dropped. When you replenish your balance, all the dropped tasks will restart automatically, and you’ll also be able to download your results. Be careful, when doing this kind of rendering, track the expected time, and make sure to calculate the costs in advance to avoid losing your progress and money!
Rendering of animation/frames:
The fastest frame will finish rendering and will be saved to the FTP server, but the rest of the frames will be dropped. When you replenish your balance, the rendering of dropped frames will restart automatically, and you’ll also be able to download your results.
Just be aware that all the tasks that are dropped due to billing problems will restart automatically once your balance is replenished. You can manually cancel them.
Can I render several projects at once?
Yes, for this you just need to pick a plan that will support the amount of projects you require. “Standard” lets you start 3 tasks at once, “Pro” - 5 tasks, “Business” - 6 tasks.
Can you guarantee that my scenes and ideas won’t be stolen?
We take all the measures of online security to prevent any unauthorized access to the data we receive. The safety of copyright is guaranteed by the agreement we sign before the start of the work.
Furthermore, our team is aiming for long-term partnership with every customer – that’s why it is our priority to preserve good relationships with our clients.
How do I choose RAM size?
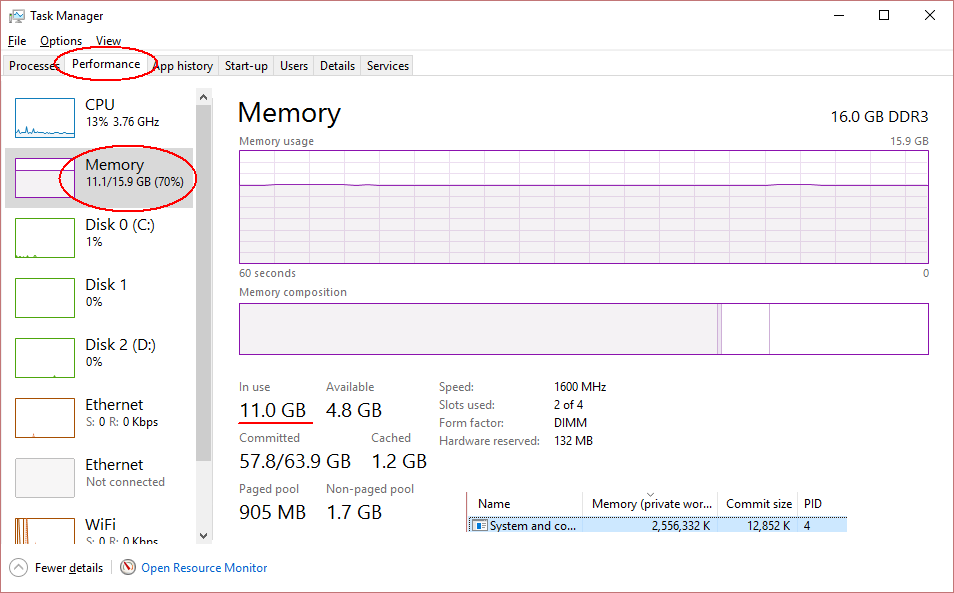
The easiest way to figure out the required RAM size is to try and launch the render of your scene on your PC. Now open Windows Task Manager (Ctrl + Shift + Esc) - “Performance” - “Memory”. Under “In use” you will see the right value. When setting up your scene, choose the option closest to this value (but not less than that).
If your computer doesn’t have enough RAM to run a test render, choose a RAM size bigger than the one you have installed.
How do I calculate the cost if my CPU is not on the list?
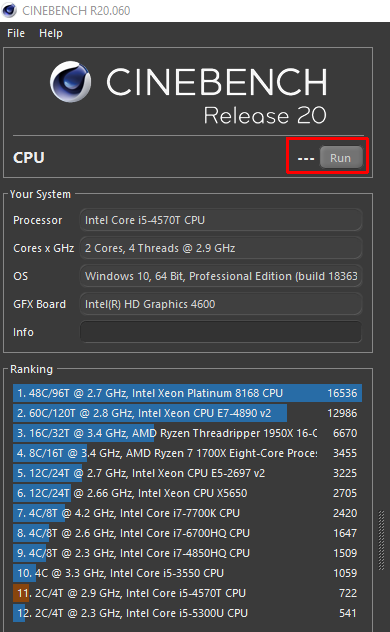
If you can’t find your CPU model in our calculator, use Cinebench R20 value instead. It is calculated by an application from Cinema 4D developers. Download Cinebench R20, then unzip the archive and launch Cinebench.exe file.
In the opened window you’ll be able to see your CPU characteristics. Before starting the test, make sure to close all the running applications so they won’t affect the final result. Do not start any applications while the test is running!
Start the test by clicking the Run button. It will begin rendering a test scene, which could take several minutes depending on the power of your CPU. Once finished, write down the value.
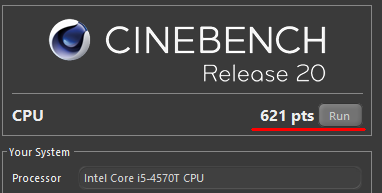
Repeat the test two more times and calculate your Cinebench R20 value as the average of all three.
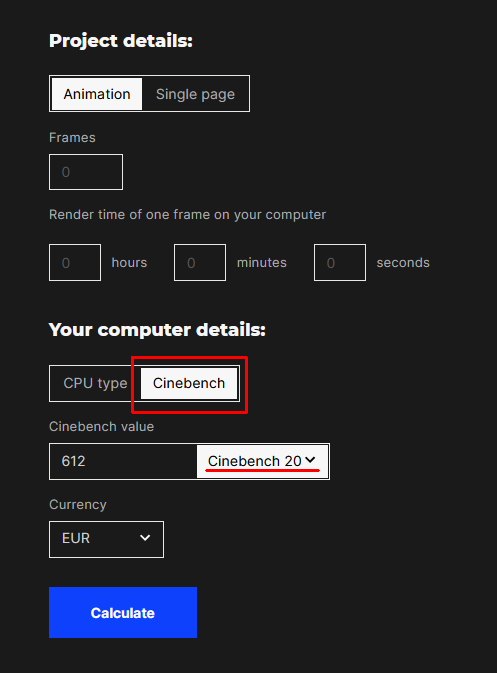
Now as you open our calculator, choose the Cinebench option, pick Cinebench R20, and enter your number in the corresponding field.
Progressive or Bucket?
If you are not sure which Image Sampler to choose when rendering a V-Ray project on our render farm, read our article all about this topic here.
To summarize:
Use Progressive Image Sampler for rendering animation previews, and to check that your scene was imported correctly to the render farm. You can watch your rendering in real time by clicking the “Preview” button in the online service.
Use Bucket Image Sampler to render your final image or animation, as it is more stable and effective and provides tools for recovering the image.
How to optimize the scene?
2) Do not use CoronaLightMtl or Self Illumination as primary light sources – their calculation takes much longer and the noise will not disperse even in hundreds of passes (or possibly ever).
3) When making glass materials using Refraction: Caustic will slow down rendering, and should only be used in close-ups. For glass in the windows, you can use Thin option.
4) Low-resolution HDR maps create lots of noise. For interior scenes, it is advised not to use them at all.
5) If you are using LightMix, and you have values of 5-10 or more in it’s options – better bake it! For this, click the '>Scene' button. Your preview will change, but once you start rendering again, it will look the way you adjusted it, and there will be less noise.
6) Volumetrics (subsurface scattering, SSS) not only slows down the rendering, but also leads to noises that are hard to get rid of.
How to use FileZilla?
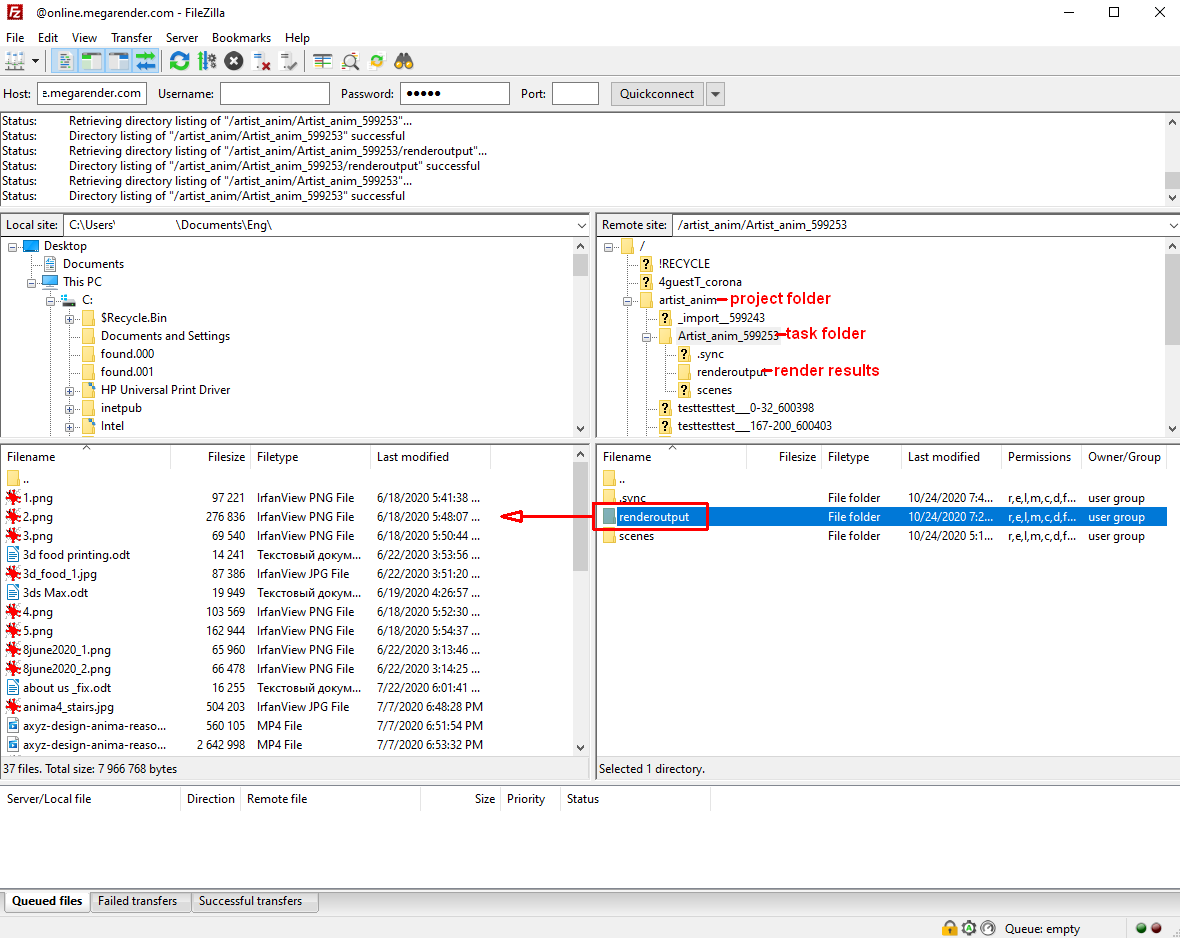
Download FileZilla here and install it. When you open it for the first time you’ll see this screen:

Fill in the following data at the top:
Host: my.megarender.com
Username: your email that you used to register in our online service
Password: your password for online service account
Port: 21
Then click the Quickconnect button.
If you get a warning message, just click OK and it will disappear.
Now on the left side you see your folder structure, while on the right side you see your account folders. Each project is stored in a separate folder. Double-click on the needed project and then on the task folder.
To download render results drag the “renderoutput” folder to the left side of the screen, where you opened the needed directory. Depending on the size of the files, download can take several minutes.
How to Download from Google Drive in Bulk?
If you need to download results from several tasks with multiple files each, it’s best to use Google Sync. This app lets you synchronize folders between different devices and provides a fast and reliable way to save files in bulk.
1) Open the folder with your results following the cloud link near your completed task. Make sure to open all of them so as to make sure you have access to them.

2) In your Google Drive, go to Shared With Me and select all the folders you need downloaded (use SHIFT to select multiple). Press Shift + Z and choose “My Drive” as a destination. This will create shortcut links to these folders.

3) Install Google Drive for desktop using the following link: https://support.google.com/drive/answer/10838124

Launch the app, log in using your Google Drive account, select a folder for where your Drive data will synchronize, and wait for it to complete.
4) Open the Google Drive folder on your computer. Here, you will see the shortcuts to your results.

5) Open the shortcut and copy your files to a different folder on your computer. Repeat for each task.