
It is not that hard to learn the basics of 3Ds MAX and start creating models and visualizations for yourself, but real professional skill comes only with experience. Even if you have been working in visualization for several years, it is important to raise the quality and effectiveness of your work. We picked 10 good habits of professional visualizers every specialist should develop to become successful.
1. Maintain comprehensible project folder structure
Even if you are working in a studio, create a fixed folder structure for projects and strictly follow it. For example, create a separate folder for each client, or start the name of each project with the starting date as YYYYMMDD to simplify sorting by name. Follow one rule for naming files: project code name, version, date of last edit – anything that will help you easily find the required file in the future.
Avoid using special symbols or letters from other alphabets when naming files, folders, and even users in Windows. 3Ds MAX often glitches out when working with Cyrillic and Arabic letters or hieroglyphs, which leads to errors and data loss.
Store all used textures and cache files inside the project folder to decrease RAM load during modeling or rendering. Archive old projects to clear storage space; this archive can be stored on a separate hard drive or in the cloud.
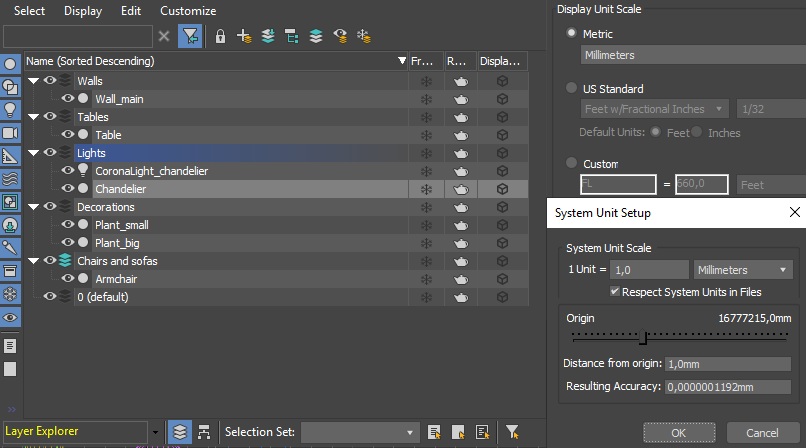
2. Use real measuring units and object sizes
The first thing to do in freshly installed 3Ds MAX is to set up System Units. If you are doing object modeling or interior design, it's better to use millimeters, centimeters, or inches. If you are working with multi-storey buildings or whole city blocks, pick meters or feet. What is important is to never use the “Units” set by default. Importing objects into such a scene may lead to unexpected results.
Create objects in accordance with their real-life measurements. Such objects can be used in other projects or sold through online marketplaces for passive income. Each time you model something approximately, the imported objects may end up being too big or too small. In big studios, several people can work together on a single project, and following real sizes is not a whim, but a necessity.
3. Work with layers and rename objects
Move different scene elements to separate layers: walls and partitions, light sources, soft furniture, frame furniture, decorations, carpets, etc. This way, you’ll easily be able to find any object, e.g. a table lamp, if you hide all the layers except the one with light sources. Xref and proxy objects should be moved to separate layers too.
Give objects simple, descriptive names so you can easily find them in the scene layout. Instead of Box001, Cylinder005, and Sphere126, you should have Sofa_Blue, Lamp_Flower, and Vase_Bedside. Even if you have several sofas or vases, it will be much easier to find a specific one among them instead of clicking through hundreds of default names one by one. Remember to only use letters and numbers to avoid glitches and/or data loss.
4. Go from general to particular
Always use the “from general to particular” workflow when starting a new project. It may seem obvious when you are working with interiors – raise walls, windows and doors first, then create furniture and other objects. But eventually you may feel an urge to create smaller or more unique parts, furniture or areas first when tackling a bigger project. But if you are suddenly asked to show intermediate results, you won’t have anything demonstrative. That’s why it’s always best to start with the general – create basic architecture, arrange placeholder boxes for the furniture, and set up the light.
This way, you’ll be able to see and feel the progress as you are working and provide in-progress shots for client control at any time.
5. Control objects’ topology
It takes years to become a pro modeler. Even if you are just starting, always make sure you have a clear lattice for all your objects. Avoid n-gons and minimize the amount of stars in the topology. Retopologize high-poly models exported from other apps (ZBrush, Marvelous Designer, etc.). This will not only prevent weird artifacts from appearing during texturing and lighting, but will also reduce the size of the scene. Retopology is a great tool to turn all the polygons into quads and reduce their amount tenfold or more.
When creating low-poly objects for later use with TurboSmooth, don’t forget to add edge loops and prepare the corners. Such objects definitely shouldn’t have any triangles, as they may warp or even rip the surface after smoothing.
6. Aim for non-destructive modeling
Non-destructive modeling in 3Ds MAX is based on the Modifier Stack. When working with Editable Poly, each new element should be created through a new Edit Poly modifier. This way, when you notice a mistake in your work, you’ll be able to return a few modifiers back and fix it; sometimes you won’t even have to delete the modifiers above it. If you are doing everything in a single Edit/Editable Poly, it will be impossible to go back when your undo buffer runs out – and you will have to start over.
At the same time, when you’ve finished modeling, all the modifiers should be merged via the Collapse To/All option. Otherwise, if you export such a model, it may “explode”. You should not only collapse the basic geometry together, but also the UV maps. You can leave TurboSmooth above the collapsed stack and make it visible only in render view to reduce memory load during work.
7. Remember chamfers on edges and corners
Perfectly sharp edges and corners do not exist in the real world – even knives and blades have chamfers, not to mention frame furniture or walls. Chamfers can be created by geometry or materials. For objects in the foreground or in the middle of the image, it is better to model chamfers (manually or through special modifiers and plugins). This way, they look nicer and more realistic. For small objects and backgrounds, use special masking maps when creating materials, such as CoronaRoundEdges or VrayEdgesTex. These masks will work best if you follow the modeling rules from good habit number 5.
To raise the realism of the final image, try adding small gaps between walls and baseboards. But such gaps and slits should only be added where they really do exist. To know all the right locations, you’ll have to learn principles from good habit number 9.
8. Understand how light works
When setting up outside light, remember that its hue is on the cold side of the spectrum. To create the same effect, slightly move Environment’s hue into blue (don’t overdo it). At the same time, artificial light sources give out warm light, so choose the other side of the light spectrum for them – yellow or orange (once again, don’t overdo it).
When rendering a scene with bright sunlight coming in, don’t turn on all the inner light sources – it looks strange and unrealistic. Turn on the lights only when it makes sense, e.g. in dark corners or in big rooms with small windows. If you really want to show off the inner light sources, set up an evening or night render shot. By the way, at night, outside light still gets inside through the windows, but it is very dim and can only be noticed near windows and on window sills when the lights are off.
9. Constantly learn new things
Even if you are given the most detailed floor plans, just knowing 3Ds MAX functions won’t lead to a good visualization. You must also understand how construction, finishing work, and furniture assembly is done. It’s easy to spot renders from newbies from their missing electrical sockets, radiators installed without any piping, and facades that would be impossible to construct in real life.
Building a house involves not only designers and architects, but also construction and finishing workers, and piping, electricity, and ventilation installers. You don’t have to be an expert in all these spheres, but you must be aware of their existence, which will help you add realistic details to your scenes. For furniture modeling, it will be useful to know where and how the assembly parts are connected, how the fabric stitches are set up, and where scratches and uneven patches could appear.
Most of such knowledge comes from experience and working with experts, but you can still learn new things even before starting the project. Read professional magazines, books and blogs, look up works from famous designers and architects, never skip “Making of” articles or videos, even if you feel like you definitely know how it was done. A true master continues gaining new knowledge throughout their whole career.
10. Use plugins wisely
If you keep on repeatedly having to solve the same problem in new projects, there is a very good chance someone’s already created a script or a plugin for this that does it with a single click of a button. Never hesitate to look up new scripts or plugins to improve your workflow. But at the same time, take note of which add-ons you are using regularly, and which are just taking up space.
You will probably realize you are only using 5-7 external tools regularly. If a popular and useful plugin doesn’t fit into your workflow – just forget about it and don’t try and force yourself to use it, despite what everyone else’s opinion could be. The most important thing is the quality of your renders and meeting deadlines.

This article is part of Megarender’s series for new visualizers. We write about tools and techniques for improving and optimizing your work. And for fast rendering, use our cloud render farm.


