Architectural visualization is a great way to show what a future project will look like. The visualizer usually renders dozens of pictures from different cameras to show every small detail of the upcoming interior or exterior. However, there is another way to show a project in a more immersive way: a 360° spherical panorama. Usually, viewing a panorama requires accessing special websites or installing dedicated software. However, it is also possible to turn a panorama into a video, upload it to YouTube, and look at it in a browser or in the app. In this tutorial, we will use 3DS MAX and Chaos Corona to render a 360° video for YouTube.
Rendering an image
Create a scene using 3DS MAX and Corona as you would do normally. You don’t need to change anything in the materials or lights; the only difference is the way the camera will be set up. Place CoronaCam in the middle of the room (or in the middle of the space you’d like to show) - this will be the point of view in the video. The height at which the camera is placed should follow the visualization composition rules. In camera settings, go to the ‘Perspective & VR’ menu and change the camera type to ‘Spherical 360°’. The camera object will turn into a sphere, and its target will define where the center of the final rendered image is. It is recommended to keep a target and a camera on the same level on the Z-axis.
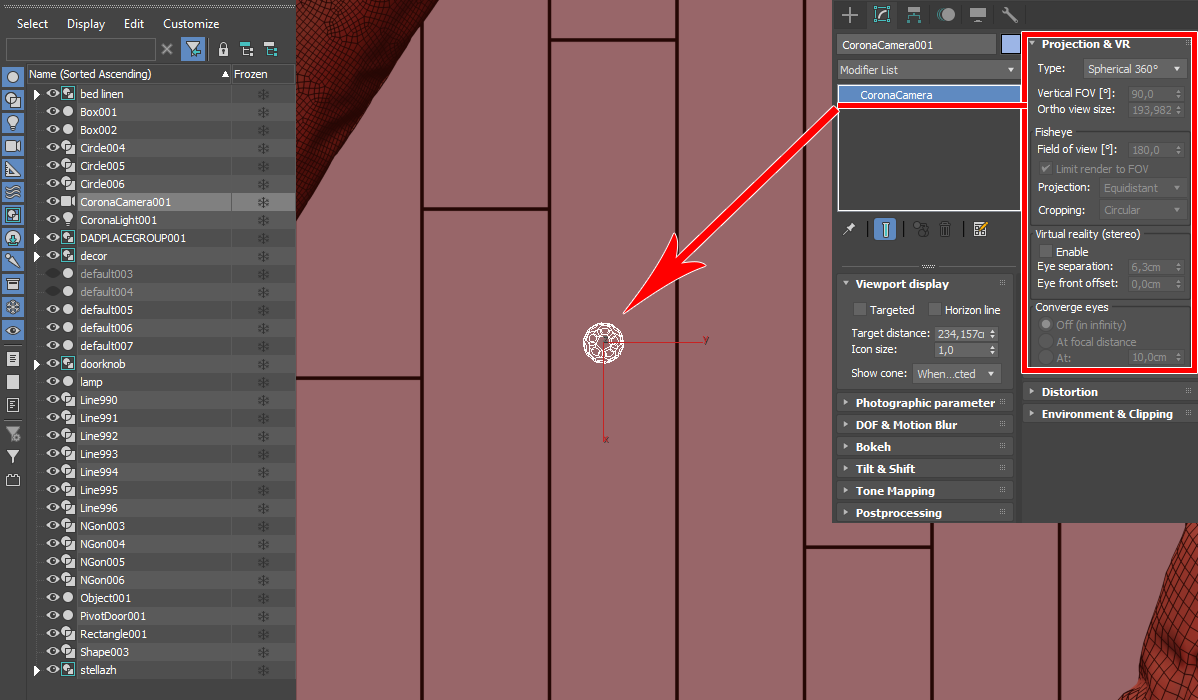 After setting the camera type to Spherical 360°, its icon in the viewport changes
In render settings, set the image size to Custom, with a 2:1 ratio (for example, 2000 x 1000, or 3400 x 1700 pixels). Determining the actual resolution is the tricky part. For the highest quality after compression, YouTube advises videos of 8192 x 4096 or 7168 x 3584 pixels. These are big formats, and not every computer can manage rendering such a picture. You can render your image in a smaller size (especially if you only plan to watch the video on mobile) or use a Corona render farm. The lower the noise level is, the better the final video will be, so don’t forget to use a denoiser. Save the final image in a lossless file format (PNG or TIFF) so it doesn’t lose quality after compression.
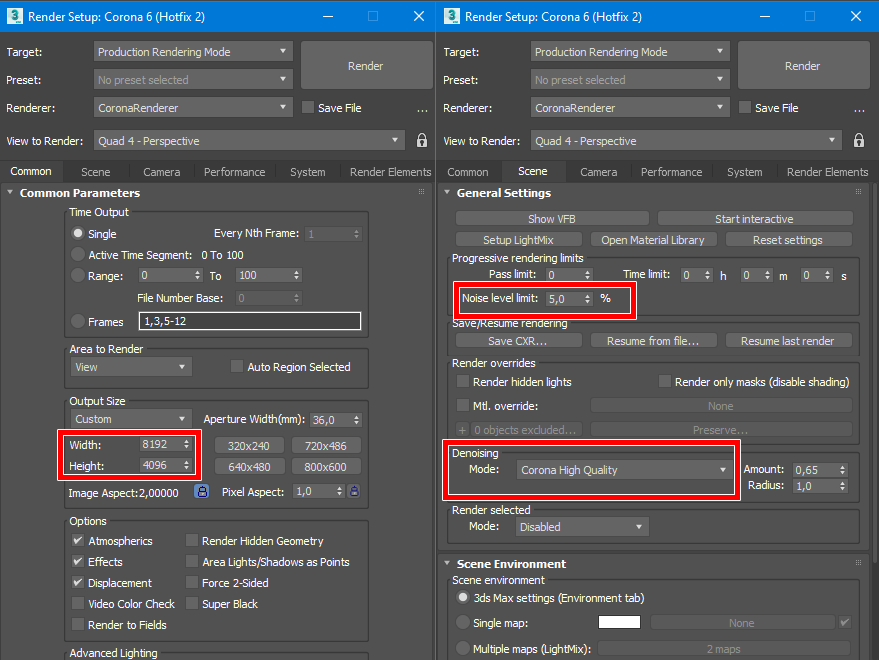 Keep the aspect ratio, a low noise level limit, and use a denoiser
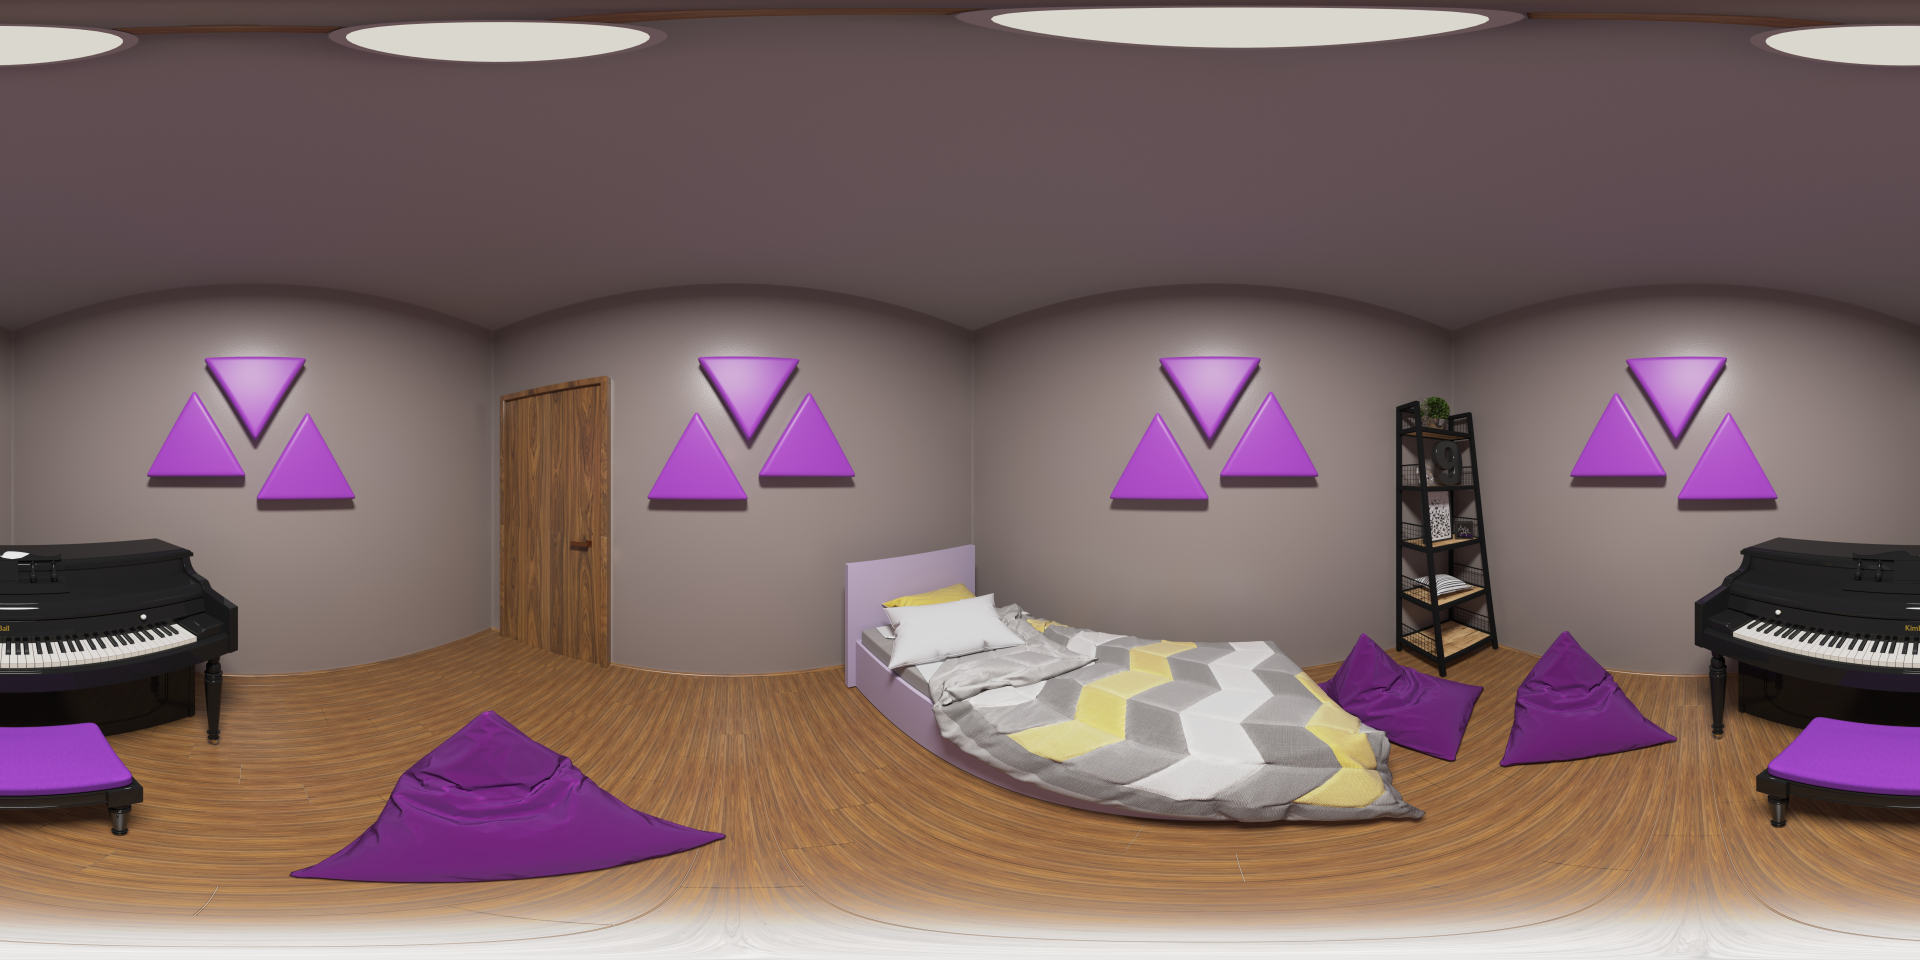
The final image will be distorted at top and bottom, but the final panorama will fold this flat map into a sphere.
Creating a video
To turn your static image into a video, you should use a video editing application. It doesn’t matter if you use something professional like Adobe Premiere and Sony Vegas, or a free application like DaVinci Resolve and Movie Maker. For our tutorial, we will be using VSDC Video Editor, a powerful open-source application.
Create a new project using the ‘Blank project’ preset, and set its width and height to match the dimensions of our rendered image. VSDC allows video size up to 5760 px for the wider side, so our project’s resolution will be 5760 x 2880 px (if you want to make a larger video, you will have to use a professional application). Drag and drop the rendered image into the timeline window at the lower part of the screen. By default, VSDC creates a clip of your image that lasts 10 seconds. To give the viewer enough time to look around the panorama, we should make the video longer. Our project runs at 30 frames per second, so to make it play for 2 minutes, the clip should have 3600 frames. Click the clip on the timeline, then change the ‘Duration’ to 3600 in the Properties window to the right. See on the timeline that your clip now lasts 2 minutes.
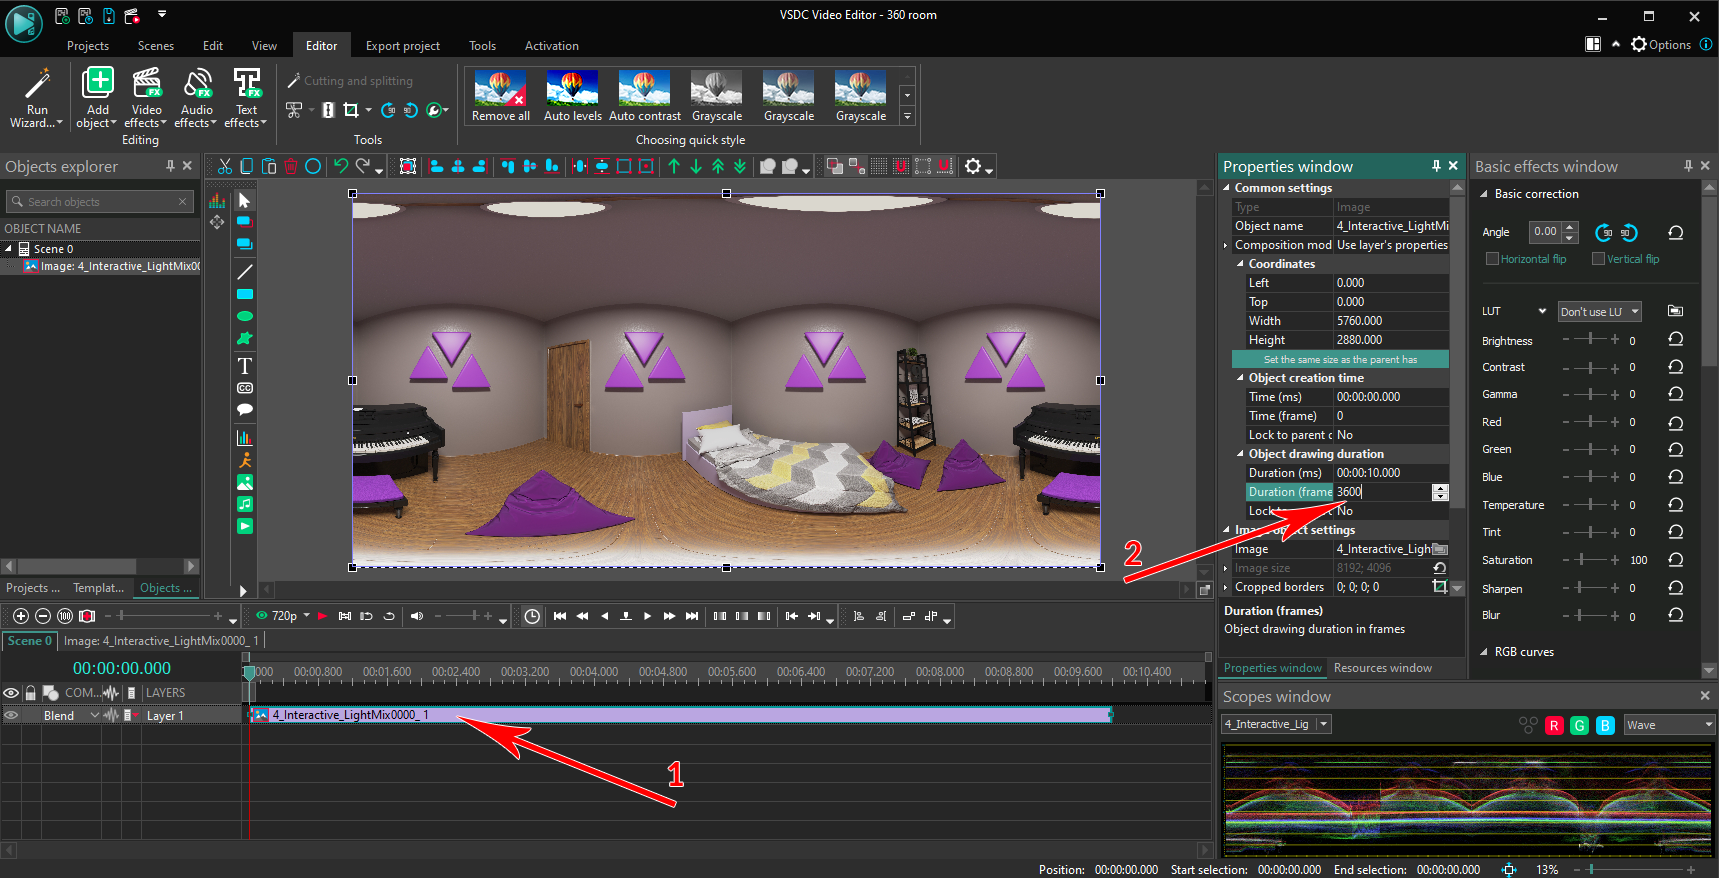 1 - drag and drop your rendered image into the timeline; 2 - set the duration of your video to 3600 frames (2 minutes)
To export the project, go to the ‘Export project’ tab, select ‘Web’ as the media device and ‘For Youtube’ as the output video format. You don’t have to change anything else in VSDC, but if your video editor doesn’t have presets, the video should be in MP4/H.264 format as per YouTube guidelines. Choose the name and directory for the output file and press the ‘Export project’ button. A few minutes later, your video is done and you can take a look at it.
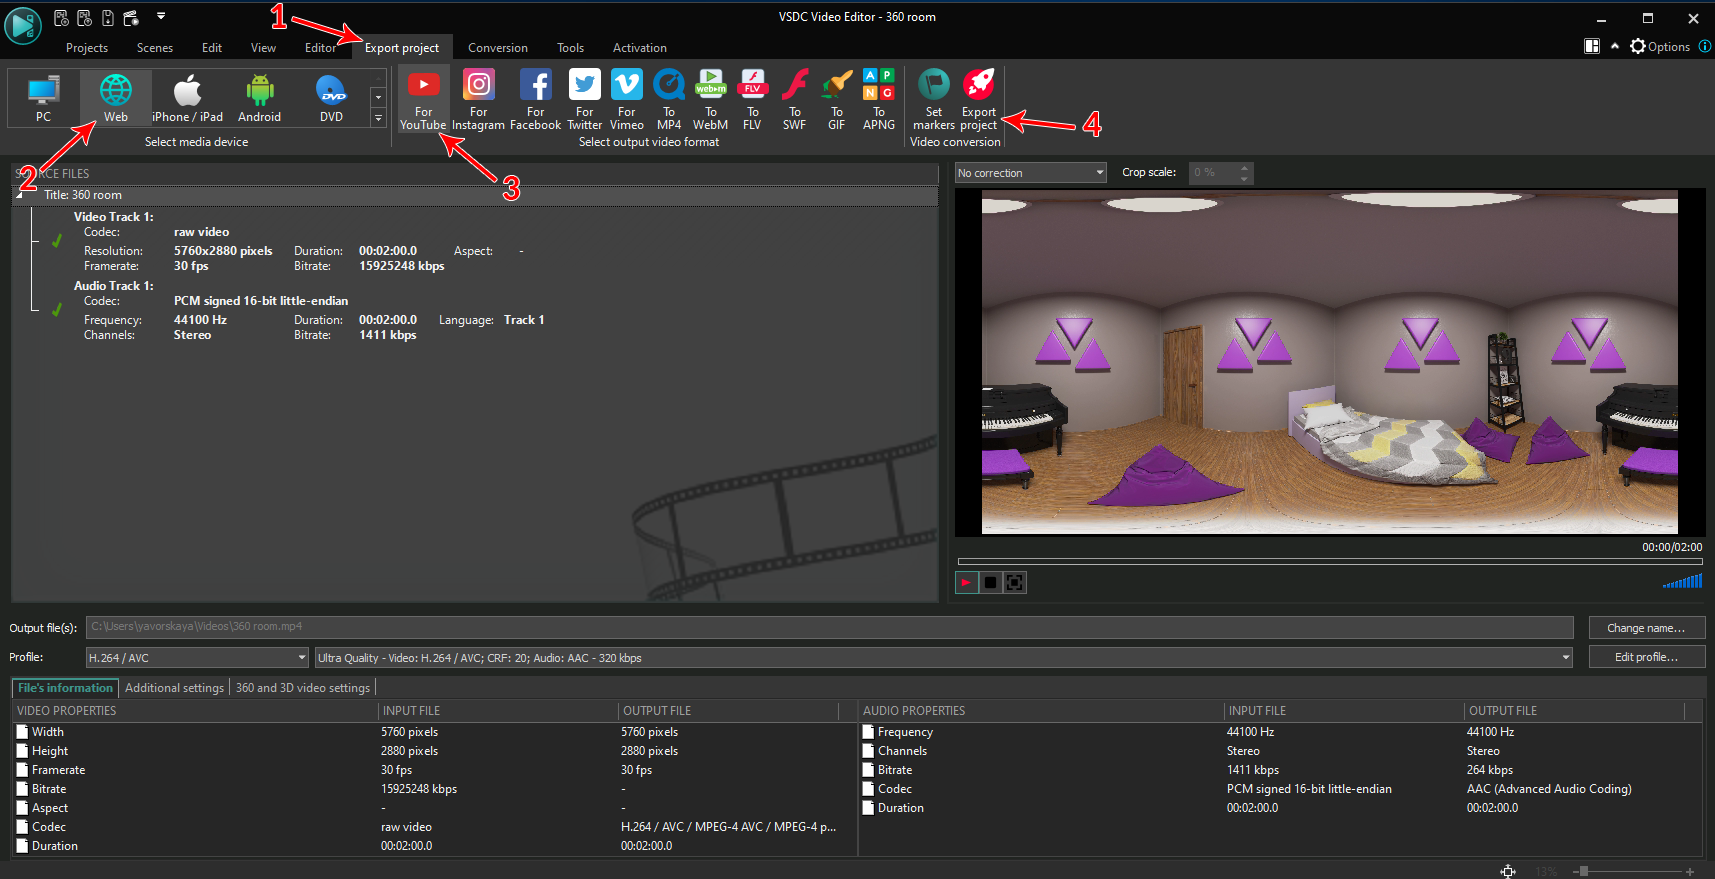 1, 2, 3 - select Export project -> Web -> For Youtube, then 4 - click Export project
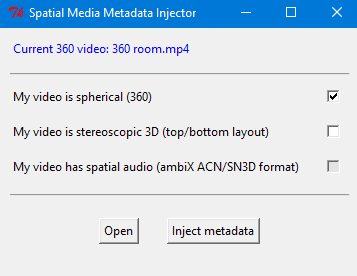
The final step is encoding the video with spatial video metadata which will help YouTube understand that it is dealing with a 360° panorama instead of a standard video. Download the official Google Metadata Injector from GitHub and unpack the archive. Launch the EXE file and choose your video using the ‘Open’ button. Select the ‘My video is spherical’ option and click the ‘Inject metadata’ button. The injector will give you a chance to pick the directory and the name for the new file before saving it.
Uploading to YouTube
To upload to YouTube you have to login (you can use an existing Google account or create a new one) and then click the ‘Upload videos’ button in the top right corner. This will prompt you to create a channel if you don’t already have one, so just choose the name and click accept. You don’t have to setup all the data for channel promotion if you only plan to show the panoramas to your clients via private links. Drag the video with injected metadata into the ‘Upload videos’ window and you’ll be shown the main details window. Fill in the name and the description of your video, select ‘No, it’s not made for kids’ (this way you don’t have to deal with certain viewing laws, even if your panorama doesn’t have any adult content), and click ‘Next’ several times until you get to the ‘Visibility’ tab.
You can choose to publish your panorama as a public video, which means anyone on YouTube will see it when they visit your channel. This is a good way to keep a video portfolio and may eventually lead to you finding new clients, though you’ll have to go back to properly set up the channel. If you want to only share the video using a link, select ‘Unlisted’; if you want to allow access only to your client using their email address, select ‘Private’.
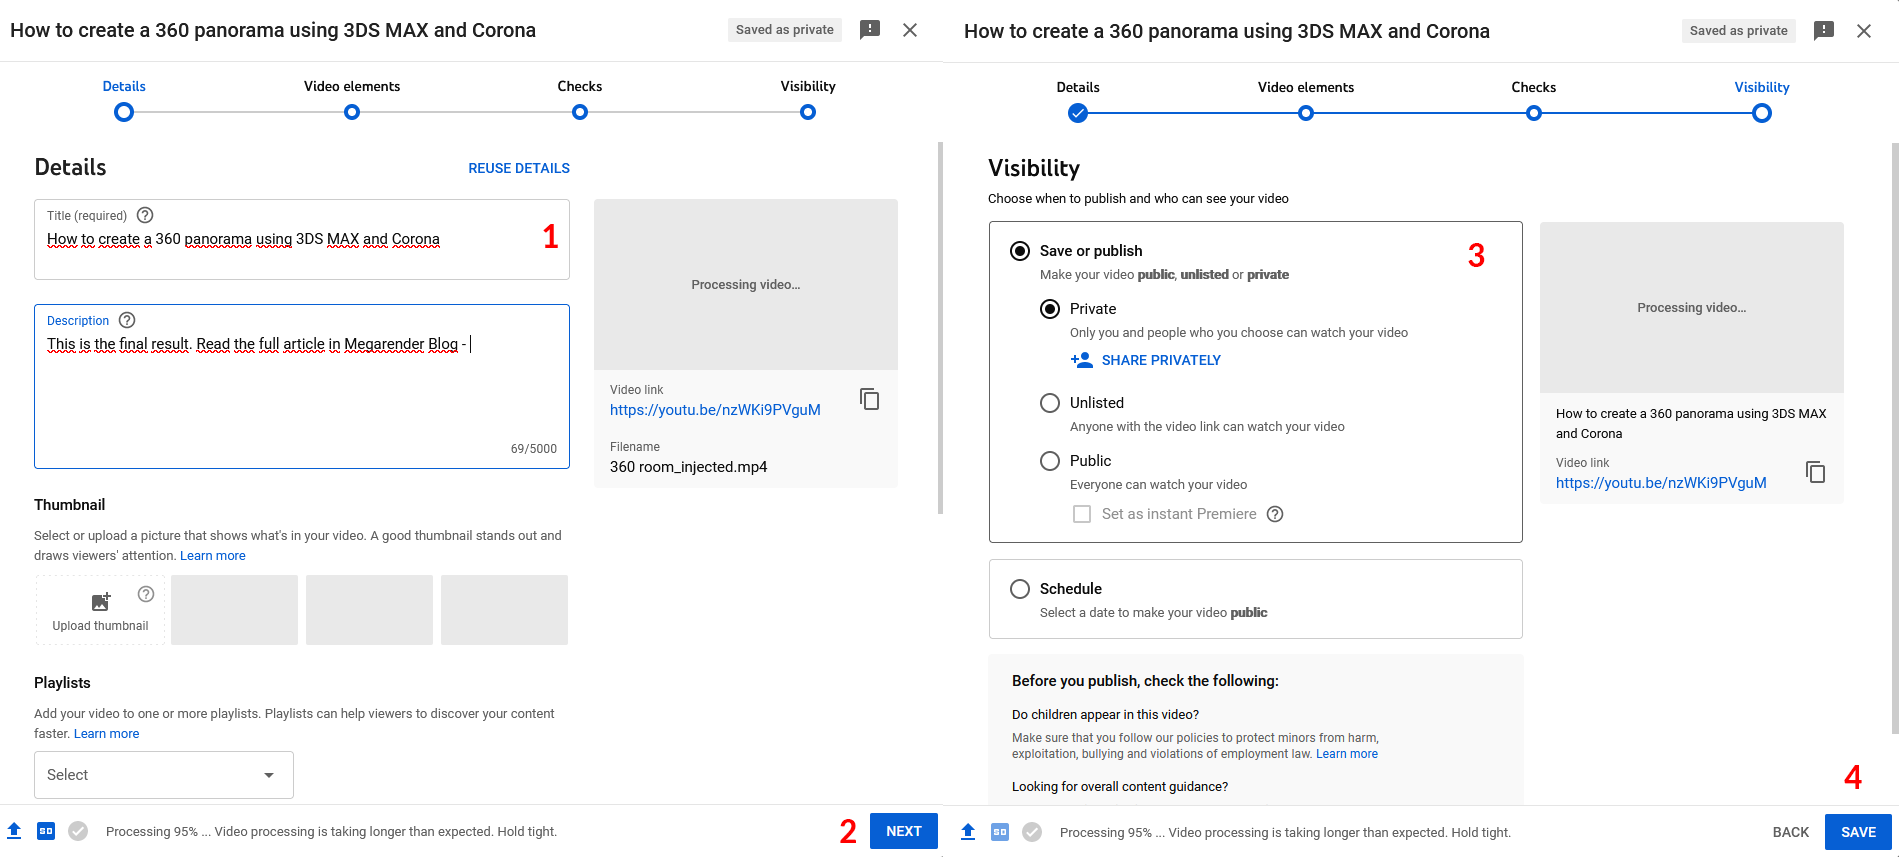 1 - give the video a name and a description; 2 - click NEXT two times; 3 - choose between three visibility options; 4 - save the result
The processing of the video will take longer than usual, because YouTube has to set up the 3D navigation tools. The higher the resolution, the longer it will take. Once the processing for the lower quality finishes, you will be able to choose a thumbnail, or upload a new one at any time. Processing HD, 4K, and 8K variants will take even longer, so be prepared to give it anywhere from ten to fifteen minutes at best or a couple of hours at worst.
Finally, open the video using the link in the YouTube Studio or your channel’s main page. As the video plays, and even when you pause it, you will be able to turn the camera and look around the room by clicking the left mouse button on the screen and dragging it around. If the video stutters as you do so, try choosing the lower quality setting or wait for it to fully buffer. 3D panorama controls may not work when you embed the video to a website or social media, so it is recommended to watch it on the YouTube website or in the app. Now share the video with your clients and let them enjoy their immersive project!
Here is the video we’ve made in this tutorial:
—
If you want to render a 4K or 8K 360° video for YouTube, use Megarender cloud render farm. Sign in and confirm your phone number to receive the welcome bonus and start rendering right away. We work 24/7 to help you finish your project on time.


