Rendering is the most time-consuming aspect of a 3D project. It also utilizes different parts of hardware than the process of modeling and texturing 3D scenes. Creating and working on projects in 3DS MAX can be comfortably done on a mid-grade computer with a separate GPU and a CPU with two to four powerful cores. Rendering, on the other hand, loads the GPU or CPU to its maximum and utilizes multithreading, so the more cores (or CUDA cores) it has, the faster it will go. How can you reduce your project’s 3DS MAX render time in Corona and V-Ray? Let’s take a look at some useful tips below.
Optimizing the 3DS MAX scene
The first step in reducing render times is optimizing the scene. The more polygons and render-time effects, and the bigger the textures used, the longer it will take to render. Starting with a polygon count, take stock of the objects you have in the scene. Are all of them in the frame, and do you really need those that are not? Hide or remove these objects and anything else scattered around the scene. Often there are objects you’ve moved out of shot and completely forgotten about, but they still take up part of the memory. Are there highly detailed items that only appear in the background or in small resolution? If so, there is no need for them to have as many polygons.
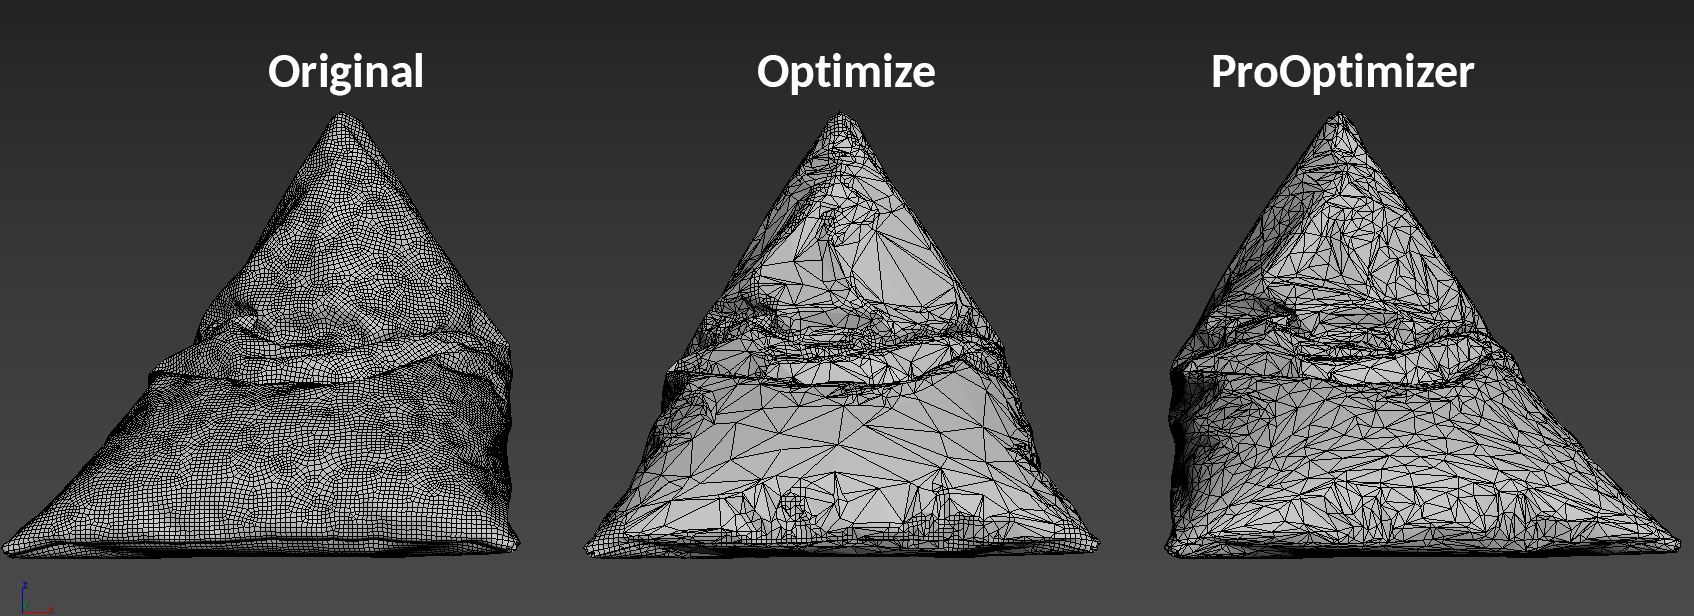
The easiest way to reduce the polygon count is by using 3DS MAX Optimize and ProOptimizer modifiers. These modifiers perform the same function but achieve it differently. Optimize offers settings to adjust the way the algorithm changes the polygons of the surface, like face threshold (the lower the value, the higher the final polygon count and the better the quality of mesh is) and maximum edge length (good for preventing the emergence of long thin faces). Default values offer a good result when you need to change many objects fast, but it is advisable to try different values. ProOptimizer is a newer tool and offers a way to reduce the polycount by a certain percentage. If you know you need to reduce the amount of faces in half, set the optimization value to 50%. You can also pick the final number of vertices. Both modifiers have options to preserve borders, materials, and UV maps and ways to take them into account when optimizing.
Highly detailed objects that can’t be optimized should be turned into proxies. The default 3DS MAX proxy tool is called XRef, and V-Ray offers its own version called V-Ray Proxy. Using this method, objects are transformed into separate files and appear in the scene as special links. They don’t take such a high load on the RAM and render faster than if they were part of the scene. If you keep the objects in the scene, it is advisable to collapse the modifier stack as much as possible and transform all the objects into mesh. This lowers the RAM load and in many cases makes rendering faster.
NOTE: Before importing your scene to Megarender, you will have to merge all the XRefs into the main scene. You don’t have to do the same for V-Ray proxies. Make sure you collect the scene with our Megapluginto avoid any issues.
Finally, having a large number of unique light sources may significantly slow down rendering. Most of the time, you don’t need every spot on the ceiling to have an individual setting. It is advisable to keep similar lights as instances instead or use a scatter engine, like Forest Pack. 3DS MAX render time also increases in dark scenes. Unless you are aiming for physically correct realism, it could prove useful to fake a filling light in the key areas of the scene so the render engine can calculate the ray bounces faster. To prevent generating too many rays that your hardware won’t be able to manage, exclude window glass objects from being affected by the sun object. After all, the glass is transparent and doesn’t majorly affect realism.
Tweaking the rendering engine settings
Once you’ve optimized the geometry, take a look at the materials you’ve created. Not every object has to have 16k resolution textures applied; these are crucial only for close-ups. If you render in 2k, almost every object will look fine with 2k textures (maybe 4k for something in the foreground). The size of textures influences how much RAM is required for rendering. Once the available RAM is full, Corona starts using swap space on your storage drive, significantly slowing down the rendering process. If even that is insufficient, rendering may crash, and your progress will be lost. The worst scenario is this happens just as the final result is being saved into a file: the RAM usage rises as the image is transferred to the hard drive.
If you use big textures because smaller ones look blurry, check the bitmap settings in the material. Bitmap (a standard 3DS MAX map found in the General rollout) has an option called Blur. It is set to 1 by default which leads to lower quality in the final rendering. Try smaller values like 0.1-0.2 and compare the results. In CoronaBitmap, the same setting is located in the Filtering submenu; in VRayBitmap, Blur options are changed in the Coordinates. Make it a habit to lower the blur value each time you add a new texture to your scene.
Another render time effect that makes rendering significantly slower is displacement. While key for photorealism, it can often be replaced with Bump instead. Once again, you probably don’t need displacement for smaller objects that are not the main part of the image. If you are using purchased assets, you may not realize some materials have their displacement values changed during merging. Displacement for the whole scene can be turned off in the Render Setup menu (F10), Common - > Options. You can also turn off Atmospherics and Effects in the same menu if you are not using them. Sometimes, malware creates garbage Effects, leading to longer rendering and constant crashes. It is advisable to check every asset you purchased in an empty scene, clean it with special plugins (for example, Prune Scene) and only then merge them into your main project.
Try not to use maximum values when it comes to Diffuse color, Refraction/Glossiness, and Translucency. Nothing is 100% reflective or transparent in the real world, and rendering engines such as Corona and V-Ray start slowing down at these peak values. Set the amount to a maximum of 0.95-0.99 to ensure nothing out of the ordinary happens at render time.
Rendering strategies
With your scene optimized, it’s time to get into rendering proper. The first step is setting up rendering limits correctly. In Corona and V-Ray Progressive, rendering can be limited by a time period. This seems like the ideal solution to reducing render time. The problem is that you can’t guarantee the quality of an image if you do so. Thirty minutes of rendering may result in a beautiful picture or a noisy mess. Time limit is useful for animations and previews but should be used cautiously for final renders.
Noise limit is the way to reach exactly the quality you need. Ideally, you’d aim for the lowest possible noise but there are caveats. Rendering time from the start to 4% noise often equals the rendering time from 4% to 3%. Reducing the noise threshold value increases rendering time exponentially. In the case of progressive rendering, this may not be a problem; stop the rendering before it reaches the set value if it already appears good enough. However, as mentioned before, Corona tends to eat through RAM and crash on save. Faster rendering reduces the risk of this happening at later stages. Pass limits can be a good middle ground. To determine how many passes to set, render a small area of the image (preferably one with the most complicated geometry or materials) until you are satisfied with the result and note the number of passes already completed. Use this amount for the final render.
Progressive image sampler in V-Ray and Corona rendering works best with a denoiser. Several denoisers are already included with 3DS MAX and your rendering engine of choice, and others can be used as standalone applications. Depending on the complexity of textures, denoising can give good results even with starting noise levels of around 10%. The best and fastest result for HD images can be achieved by rendering up to 4-5% of noise and then denoising.
If you don’t have time to track the progress and need several images rendered (using batch render), then V-Ray bucket render is a better choice. Bucket image sampler is often a faster option too. The default options are balanced, but you can spend some time running tests on smaller resolutions and try out lower Max. Subdivs values. Reducing them even slightly often doesn’t affect the general quality but prevents buckets from getting stuck on certain materials, like tinted and frosted glass, liquids, mirrors, etc.
Going back to Corona, LightMix can affect render times when you use values that are too high. If you create a light source with low intensity and then increase this intensity tenfold in LightMix, there is a high chance of fireflies appearing during rendering. Fireflies are single white pixels that take a very long time to disappear. To prevent them, bake your LightMix using the “>Scene” button. This will transfer settings to the actual light sources, and they will be bright enough to render without problems.
If your rendering slows down in V-Ray because you are hitting a RAM volume cap, try this other trick. V-Ray uses its own frame buffer, but 3DS MAX’s frame buffer still runs and takes up RAM. Instead, set the 3DS MAX frame buffer resolution to a small value (like 100x100) and define the needed resolution in V-Ray frame buffer settings instead (available in V-Ray tab in Render setup menu) by removing the check from “Get resolution from MAX”.
—
All of these tips are useful even if you are rendering in the cloud on an online render farm. The lower the 3DS MAX render time, the cheaper it will be. Optimizing your scene and rendering it online is often much cheaper than investing in upgrading your own hardware. Megarender offers discounts proportional to your rendering volumes. Try it out for free after completing the registration.


