Chaos V-Ray has a reputation for being very complicated to set up for newbies. It provides hundreds of parameters to tweak, which is overwhelming for anyone not familiar with them. Eventually, every professional would find render settings suitable for their needs and save them for later. These V-Ray presets then get shared on the internet, where less experienced visualizers adopt them without understanding what they mean. This could lead to unexpected results on final renders. To make learning a better experience, V-Ray quick settings were introduced.
Simple doesn’t equal the best
V-Ray quick settings used to be accessible from the V-Ray Toolbar via an icon next to V-Ray Render Settings. They could also be added to another toolbar by searching for “Quick V-Ray render settings” in the main menu Customize -> Customize User Interface -> Toolbars.
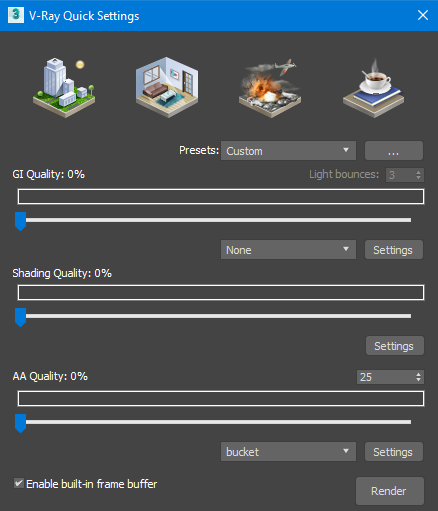
Clicking V-Ray quick settings opens a new window with four render presets. Three of them represent the main cornerstones of what V-Ray is used for: exterior visualization, interior visualization, and VFX. The last is a simple preset for test rendering and presentive visualization for catalogs and advertisements. Each preset switches the settings to the mode where they are expected to give the best result.
However, there is no guarantee these presets will result in beautiful images. Complex materials like glass or water may look different and less realistic, rendering may take a long time, and important effects may switch off. To understand why, we’ll have to first learn what the V-Ray rendering settings mean and what changes when we change them.
GI and how to choose it
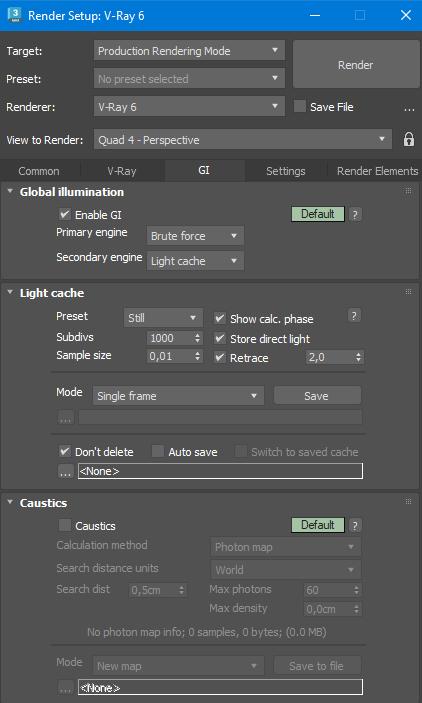
The 3DS MAX Render Setup menu (F10) contains the main V-Ray settings in two tabs: V-Ray and GI. GI (or Global Illumination) refers to how rendering engines calculate the physical effect of light bouncing off the surfaces and affecting nearby objects. This effect can be noticed when you put a brightly colored object on a white sheet of paper; for example, a red object leaves a red-tinted shadow. In real life, the light can bounce an infinite amount of times, but in 3D visualization, limits have to be set to reach the balance between quality and the time it takes to reach it.
V-Ray offers three main GI calculating methods: Irradiance map, Light cache, and Brute force. The first two offer higher calculation speeds while sacrificing some quality, while the latter gets the best results but is much slower.
The Light cache (previously, Light mapping) algorithm was developed specifically for V-Ray and approximated global illumination by tracing rays coming out of a camera. It is simple and, therefore, fast, works well with any lights, correctly handles small objects and corners. This made it popular for use in animation. The downsides are that it doesn’t draw bump effects well and can not be used in distributed rendering. It is also not adaptable and has to be calculated in the same resolution as the final image.
The Irradiance map algorithm builds a data cloud for a selection of points in the scene. Afterwards, V-Ray refers to this map when drawing every pixel of the final image and approximates the result from it. Irradiance map is very fast, but it may cause data loss for highly detailed geometry and small objects. It can be calculated in distributed mode and then shared between render nodes. Pre-calculating IM is often used to prevent flickering in animations.
The Brute force algorithm is the slowest one because it calculates illumination for every single point in the scene independently. This also leads to the highest quality of image that can be reached in V-Ray. With modern processors, Brute force becomes a much more viable option for GI calculation.
All three algorithms can be used together to achieve the needed result. Brute force as the primary engine will provide the cleanest image. To reduce the rendering time, try using Light Cache or Illumination Map as a secondary engine.
I just want to click a single button!
V-Ray quick settings were useful for new users who were only starting to learn 3DS MAX and V-Ray and were yet to familiarize themselves with rendering. However, this menu was removed from the V-Ray toolbar starting with V-Ray 5, and eventually disappeared even from the customize menu in V-Ray 6. The main reason: it became obsolete.
V-Ray 6 comes with default settings suitable for any beginner project and doesn’t require a new user to scroll through hundreds of unfamiliar terms. Default rendering starts in Progressive mode (here is an article about V-Ray progressive and bucket image samplers), Brute Force is the primary GI engine, and Light Cache is the secondary one. This makes learning the basics simple, and rendering settings can be approached only once a certain knowledge base has been built.
Here are tips on where to go next:
|
The final image is too noisy |
Try reducing the value in V-Ray -> Progressive image sampler -> Noise threshold |
|
There are lighting artifacts on the edges of thin surfaces |
Use Brute Force for both primary and secondary GI engines |
|
Rendering takes too long |
Reduce the value in V-Ray -> Progressive image sampler -> Max. subdivs |
|
I need to render an animation |
Switch to Bucket image sampler in V-Ray -> Image sampler (Antialiasing) |
|
Water and glass reflections don’t look real |
Turn on caustics in GI -> Caustics. Be prepared for rendering times to increase |
|
I want to see my changes in real time |
Start interactive rendering in V-Ray -> IPR options -> Start IPR |
This article is part of the Megarender CGI Academy Blog, where we post tips and tutorials for 3DS MAX, V-Ray, Corona, and other 3D software. Our online render farm offers an easy way to render projects of any size with special discounts for regular users. Try Megarender for free by completing the signup process.


