
We have already taken a look at the basic animation techniques in our “3DS MAX Animation: First Steps” article. However, there are more handy tools for 3D animators to use when creating complicated sequences or working with characters and procedural objects. Using only basic keys and curves may increase the workload exponentially the longer the timeline becomes and the more objects that are added. In this article, we are going to highlight several features that make working on a 3DS MAX animation easier and faster.
Loops
The foundation of most complex animations is a standard loop. Many actions need to be repeated at steady intervals. Characters breathing and walking, car wheels turning, and leaves trembling from the wind are all such actions. 3DS MAX has tools that will automatically repeat or ease the actions in and out without having to manually copy and paste the keys throughout the time segment.
Create a simple animation of a ball going up and down on frames 0, 10, and 20. Now, we want it to continue bouncing until the end of the timeline. Go to the Graph Editor, select the changing transform axis, and click the icon for Parameter Curve Out-of-Range Types.
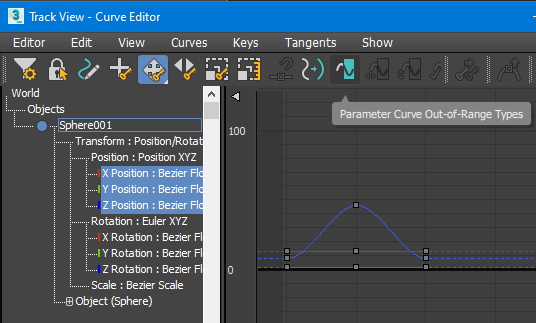
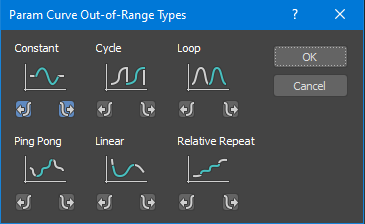
In a new window you will see six ways to extend your animation. The incoming and outcoming loop types don’t have to match. In our example, set both in and out types to Loop. Now, if you return to your timeline and play the animation, the bounce will be repeated until the end.

When you need your object to continue moving in a certain direction, use Relative Repeat instead. This way, the animation will be repeated from the point at which the previous loop finished. If you have a symmetrical animation, you can create half of it and then apply Ping Pong. 3DS MAX will mirror the animation and return the object to its initial state before starting over.
Layers and paths
Rarely would you animate an object with only one action performed at any point on the timeline. More often than not, a complex object has parts that perform completely different actions, all while moving on a separate axis. Putting all of these into the same key frames creates a stockpile that is impossible to edit. Across different software, animators use the same tool in these situations - animation layers.
The basic technique is to separate different actions into separate layers that are later combined the same way you’d use image layers in Photoshop. For example, one layer has a looped breathing animation, another has walking, and the third has the character looking around. This way, we can blend together breathing and walking without worrying about these actions looping on the same keys. The looking-around layer can be added on top. Later, the breathing layer can be used for a completely different animation, for example, with the layer of a character doing push ups.
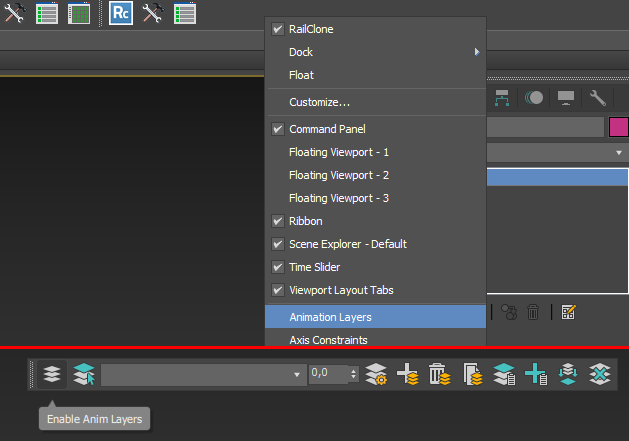
To use animation layers, you first have to activate them for the selected object. Add a layers toolbar to the 3DS MAX interface by right-clicking on an empty space in any toolbar, then activate the ‘Animation Layers’ checkbox or go to the main menu Animation -> Animation Layers. This toolbar can be docked the same way as any other toolbar. The first icon enables animation layers for the selected object, so you can start setting up different animations.
|
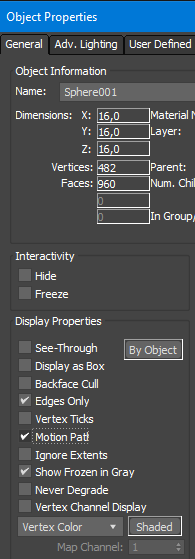
To make it easier to see how our animation changes when using the layers, let’s activate the motion path feature. Right-click the animated object and go to Object properties, then set ‘Motion Path’ to active. Now in the viewport you can see a new curve that represents how the object is moving. |
Set several keys for your object without changing the layers, this way they will go to the Base Layer. For example, move the object along the Y axis on frame 10 and 20. Now create a new animation layer by clicking the second icon. Start setting up new key frames for movement along the X or Z axis. You will immediately see how your animation path is changing. This happens because both of the layers are set to have 100% strength. You can choose the Base Layer from the drop down menu and set it to 0. Now only the movement from the new animation layer is visible. You can set up several new layers, for example, for rotation and scaling. If you loop these layers, they will continue working even if you later make the animation on the base layer longer or go in a different direction. Also try setting different values to the layer strength to see how it affects the animation.

Understanding the controllers
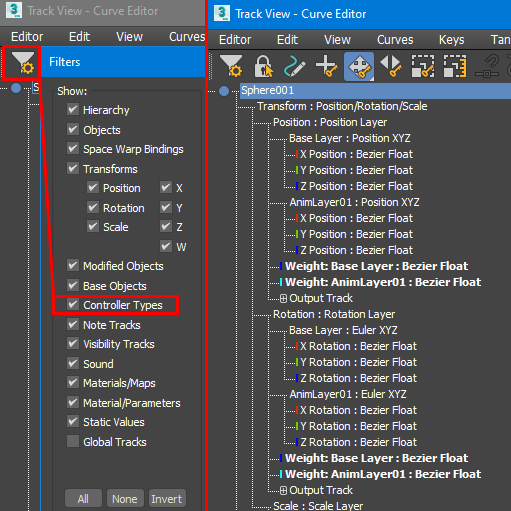
Behind the scenes, all the 3DS MAX animation is handled by controllers. Each movement, rotation, scaling, and material change is assigned its own controller. The curves in the Curve Editor are actually the representation of Bezier controllers applied by default. To see the name of the controller applied to each action, click the Filters icon in the Curve Editor and activate the ‘Controller Types’ option. You can see that both position and rotation controllers are Bezier.
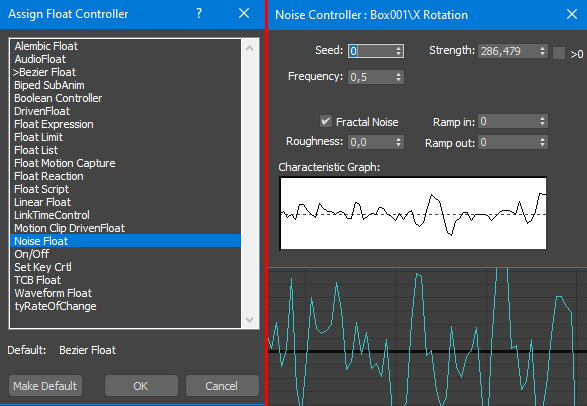
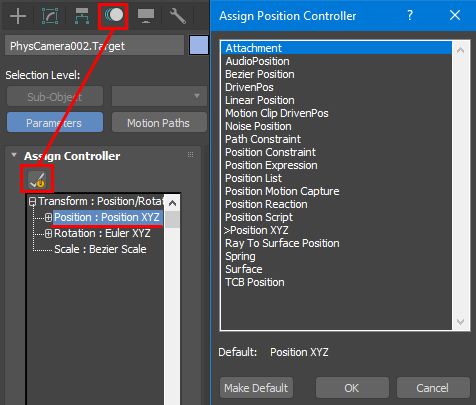
Controllers come in many types that correspond to different types of animations. To change the type of the controller, right-click the animated parameter and choose Assign Controller in the drop-down menu. For example, assign a ‘Noise Float’ controller to the rotation parameter and see how it affects the object. Noise Float doesn’t work through key frames as it is parametric, however it is possible to change its shape through its properties. Double-click any assigned controller to see its properties (if they are available).
All the controller types are described in the Autodesk documentation. Usually, the ones applied by default are well-suited for the task at hand. There are situations, however, when you might want to change the controller. For example, the default Euler XYZ for rotation won’t work well when your rotation angle is over 180° between two nearby keys. For this situation it is better to use a TCB rotation controller instead.
Interactions between objects
Any animation eventually requires several objects to interact: either move together, face each other, or just prevent them from intersecting. This can be done manually, of course, but the simple action of a hand moving a mug to the lips requires great precision if each key is to be set up manually. It’s much easier to just use the existing 3DS MAX tools called constraints.
There are seven types of constraints for different purposes: Attachment, Link, LookAt, Orientation, Path, Position, and Surface. Attachment is used for sticking one object to the other, it would be used for the example above. Orientation and Position constraints link an object's orientation and position to those of a target object. If you need to limit the area on which the object is moving, use Path and Surface constraints. And Link is a complex constraint that lets you build hierarchies between several objects.
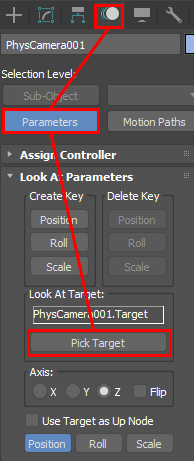
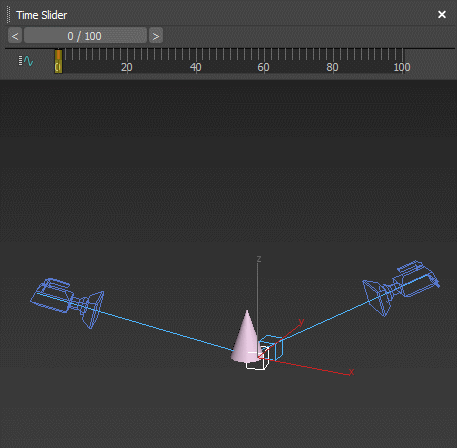
Here’s an example of how to add 3DS MAX constraints to your scene. Create any basic object, for example a cone, and set up some key frames of it moving around the scene. Now create a camera and position it to look at the object. Open the Motion menu next to the Create, Modify, and Hierarchy tabs. This is where constraints are applied. Right now the camera already has a LookAt constraint applied and the object it is following is the camera's target. Let’s change the target to be our cone. In Pick Target, choose the cone. In PRS Parameters, create a key frame by clicking the Position button. Now if you play the animation, you will see that the camera is turning to follow the cone’s movement.

A different way of getting the same result would be to instead link the target to the cone. Create another camera and select its target. In the Motion tab in the offered hierarchy, choose the Position parameter and click the icon above. In the new menu, select Attachment, then Pick Object and click on the cone. In PRS Parameters, click on the Position button to create the key frame. Play the animation again - both cameras are following the cone.
Different types of constraints have different options but the principle is the same. Always remember about the constraints when creating animations that require several objects interacting. They will make your workflow much smoother and faster.
—
Creating a beautiful and smooth 3DS MAX animation takes a long time, but rendering it may take even longer. However, this time can be reduced with the use of a render farm. At Megarender, you can get easy access to our 3DS MAX render farm via your browser and get your first frames rendered for free with a welcome bonus. If you ever have questions about how to start your project, just reach out through our support chat - we are available 24/7!


