You can create a 3DS MAX scene on any mid-level PC or laptop; but a realistic rendering of such a scene is a completely different process and demands a powerful CPU and a large amount of RAM. The rendering may take hours or days (in the case of animation) even on gaming computers, and not every small studio, freelancer, or student can afford a Threadripper. This is when render farms – special services that provide powerful computers to render 3D projects on – come to the rescue.
Moving a scene between different PCs (especially remote ones, like render farm servers) holds the risk of corrupting links between the external files or losing the set preferences. At Megarender cloud render farm, we have been working in the accelerated rendering sphere for over 7 years now and have prepared these tips for what you may expect, and how to avoid some common mistakes when working with a render farm.
Check software compatibility
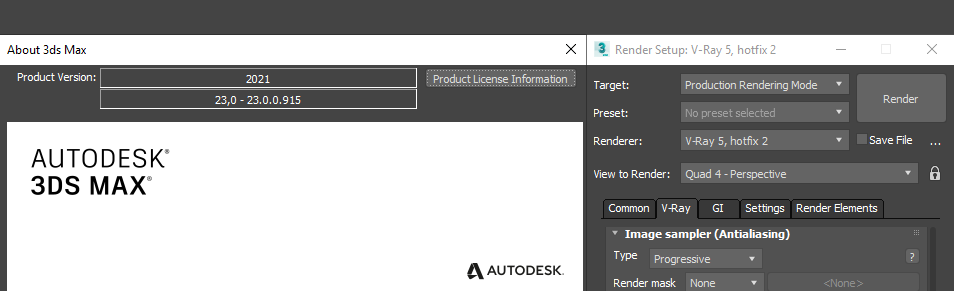
The first and main thing is to compare software versions between your PC and the render farm. Make sure your 3DS MAX (including the ‘update’ number) and rendering engine (like V-Ray, Corona Renderer, etc.) versions are supported on the render farm. The files created in the latest MAX versions won’t open correctly in the older ones, sometimes even if you export it in the legacy version. For instance, if you create a project with a ColorMap, save it for 3DS MAX 2016, and then try to open it through 3DS MAX 2016, you will receive an error message – ColorMap just didn’t exist in 3DS MAX 2016.
It gets even more complicated with rendering engines; ideally, the farm’s version should match or be higher than yours, but not much higher. You’ll almost certainly get some artifacts if you render a Corona 1.7 project in Corona 5. A scene created in V-Ray 3.20.0 or lower will be very noisy when rendering in V-Ray 3.40.0+ because of the changes to Adaptive DMC settings. Rendering on a lower version is even more unpredictable. Even if your image won’t get noisier or start showing artifacts, the overall color tone and brightness may change.
NOTE: Corona Renderer 6 introduced a new lighting system, specifically for how Corona Sun + Sky and portals work. So the projects created in Corona 5 may render differently in Corona 6.
Be mindful of the third-party plugins you are using in your scene – their versions should also match on your PC and the render farm. If you are creating an effect in an old version of a plugin, it may not show when opened in a new one (with or without an error message), and vice versa. If the farm doesn’t support the required plugin, and you can’t transform it into Editable Poly/Mesh, you’ll have to contact tech support or search for another service.
If you are not using 3DS MAX but Blender, contact us using tech support chat for manual rendering.
Prepare the mesh
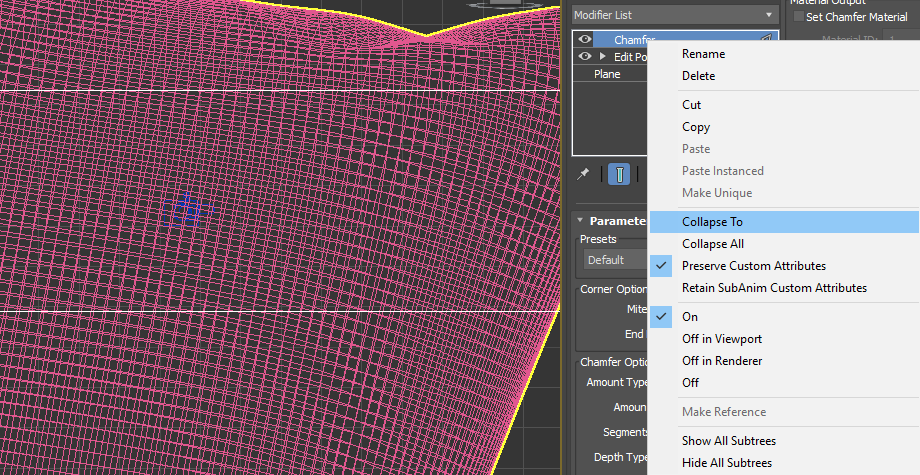
Before exporting the scene, make sure to collapse the modifiers on as many objects as you can. Each modifier is a weak spot where an error may occur during the export. An object with many Edit Poly modifiers can ‘explode’ when opening the saved file, even on the same PC it was made on. Exporting a 3DS MAX scene to a remote server sometimes leads to modifiers getting lost, turned off, or their settings changed to default. You can leave TurboSmooth as a modifier and set it to only show during rendering, but you have to do test renderings to ensure it is working correctly.
For similar reasons, you have to merge all the XRefs into the main scene. Be careful with Proxy files too: 3DS MAX has a bug causing the proxy objects to change their Scale value which occasionally makes them too big or too small.
Include all the assets
A 3DS MAX project consists not only of a ‘.max’ file, but also of all the textures and additional files used during rendering. If you store all the textures in the same folder as the scene itself, you can just archive this folder. However, even in this situation, there is a chance that a couple of files are located somewhere else on the computer (like when you are using premade materials from Corona Material Library or V-Ray Material Library).
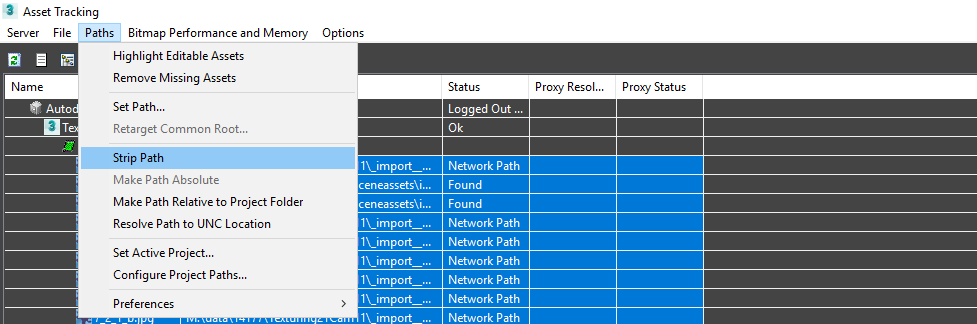
Big render farms often offer special tools and plugins to collect assets, but if there isn’t one, archive your scene using the built-in 3DS MAX functions. ‘File → Archive’ tool will create a .zip file with your scene and all the additional files (they will be placed in the folders named after the ones they were in before). Before sending the scene make sure all the textures have relative or stripped paths; this can be done through Asset Manager (Shift+T) and the Strip Paths tool.
If you are using plugins to create particle systems (for example, Phoenix FD), include all the cache files with the archive, as 3DS MAX won’t collect them automatically. These files can be very heavy (up to several dozens of gigabytes) and will take a long time to upload to the farm. You’ll probably have to contact the support team to link them properly with your project.
Properly set up rendering limits

When you launch rendering on your PC using Corona or V-Ray with Progressive image sampler, you can see the intermediate result at any particular moment and stop the calculation at any time. Render farms usually don’t provide a live preview, and you will be paying for each additional minute of server time. Therefore, it is important to set up proper conditions for your rendering to stop.
Corona Renderer offers three ways of controlling the rendering time: time limit, pass limit, and noise limit. Use the latter two in tandem when launching projects on the render farm. Define the noise level (before denoising) that will satisfy you and the amount of passes to achieve this level in. Your thought process should go like this: “I need to render an image until a noise level of 3% is reached, but for no more than 200 passes”. If your scene is properly set up and optimized, it will render faster; otherwise it will stop after the 200th pass and denoising.
V-Ray’s Progressive image sampler doesn’t provide a definitive pass limit, but it is linked to the Max. subdivs value. If you don’t know what value to choose, leave it on the default (100), but usually a lower value (30-40) is enough. At the same time, never set Noise threshold value to zero (set it at 0.005 or higher), otherwise your rendering will last for too long and will be very costly.
For both rendering engines, a time limit may be used if you have a limited budget only for rendering static images. If you are rendering animation on several different servers at the same time, each of them will render a different result during the same period of time; therefore some frames will be noisier than others. Setting a high time limit will lead to some frames rendering for longer even if they’ve reached a good quality earlier.
Let’s summarize. Noise limit/threshold is the main rendering limit; use Pass limit/Max. subdivs as a secondary condition; Time limit should only be used as a last resort.
Remember post production, gamma, and lightmix

A render farm is a service for rendering raw images and not for post production. You will get a basic picture and an array of selected masks and render elements. Then you combine these elements together using your own PC and specialized software.
If you are changing your Gamma setting when working in V-Ray, make sure the value is set inside the scene and is not picked manually when saving the image. Gamma can be changed in ‘Render Setup -> V-Ray -> Color mapping’ tab in Advanced mode. If you are not sure, set the output file to .vrimg or .exr and apply any additional changes through V-Ray Frame Buffer on your computer.
All the changes you’ve made in Lightmix for Corona or V-Ray 5 won’t appear in the raw image from the render farm. To use Lightmix, save the output file into .cxr (Corona), .vrimg or .exr (V-Ray) formats. Afterwards, you can open these files in Corona Image Editor or V-Ray Frame Buffer and adjust any Lightmix settings there. Additionally, if you have already set up your desired Lightmix on the preview image, save it into the file and use it later for any image from a render farm.
Run tests

What all the previous issues have in common is that you can notice and fix them if you do a test rendering first. Tests are made in a smaller resolution and therefore don’t cost as much. Upload your scene to the farm and render an image with 800-1000 px resolution, on the longer side. Are all the objects in place? Do all the materials and textures show properly? Do the effects done with third-party plugins look correct? Are there any changes to the lighting and brightness? Do you get all the render elements and masks as a result?
If there are no errors, start rendering in full resolution – most of the time you won’t even have to reupload the project.
Plan for data transfer times
Rendering on a render farm is much faster than on a single computer, however you must always be mindful of the time it takes to upload the scenes and assets and download the results. Archived projects often weigh several dozen gigabytes, and it will be impossible to upload them using an internet browser. If a render farm doesn’t provide a special uploading tool, use cloud storage services that synchronize with your hard drive or ftp clients.
When rendering is done, big images (4-8k and more) will take a long time to prepare and then to download. Make sure to keep this time in mind when planning your projects, so as to not miss any deadlines.
These are the most commonly occurring problems among first time users. If you make sure your scene is prepared properly, you won’t have to waste time fixing it. Once your workflow is adjusted for the render farm’s requirements, you will start rendering your projects much faster and easier. At Megarender render farm you can always ask the support team any questions about your 3D rendering tasks - we are online 24/7.


